
SharePoint Framework Extension: Pre-allocate space for an Application Customizer
Overview
An application customizer allows adding structures and content to the predefined placeholders on modern SharePoint sites. The application customizers often load asynchronously and cause the movement of the page after loading. This often observed as a flickering effect to the users. SharePoint Framework now allows to pre-allocate space for an application customizer to avoid the flickering behavior by pre-allocating the area on the server-side when the page is rendered.
In this article, we will explore the new capability of an application customizer to avoid flickering, and few considerations during implementation.
Develop SPFx extension to Pre-allocate space for an Application Customizer
Follow the below steps to develop the SPFx solution.
-
Open a command prompt. Create a directory for the SPFx solution.
md spfx-applicationextension-preallocate-space -
Navigate to the directory.
cd spfx-applicationextension-preallocate-space -
Run the Yeoman SharePoint Generator to create the solution.
yo @microsoft/sharepoint -
Yeoman generator will present you with the wizard by asking questions about the solution to be created.
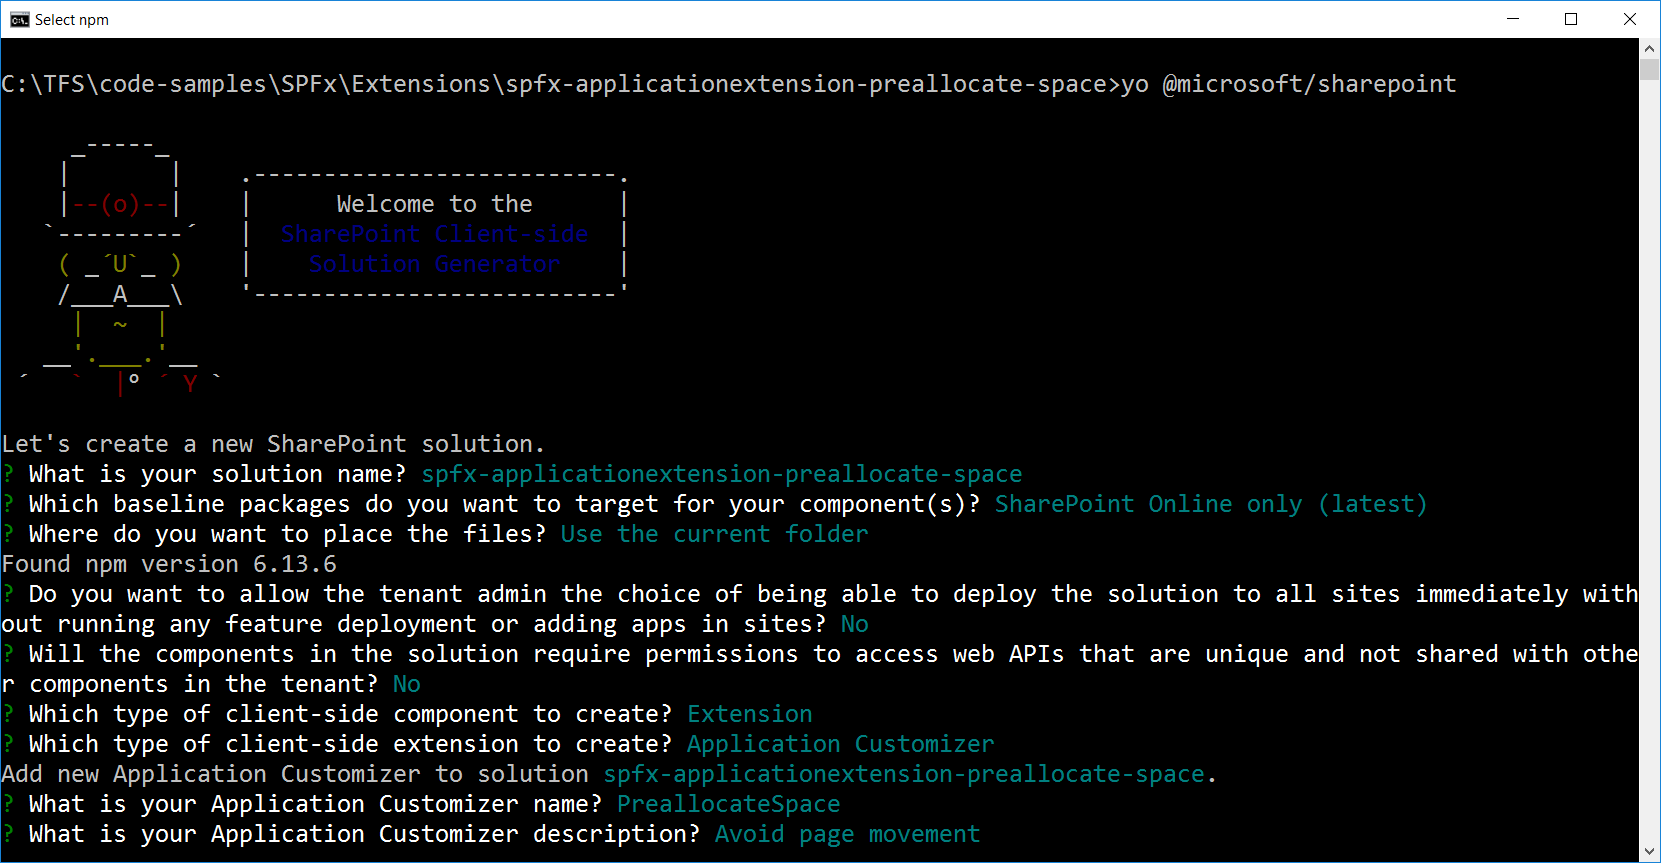
When prompted:
- Accept the default spfx-applicationextension-preallocate-space as your solution name, and then select Enter.
- Select SharePoint Online only (latest), and then select Enter.
- Select Use the current folder as the location for the files.
- Select N to allow the solution to be deployed to all sites immediately.
- Select N on the question if the solution contains unique permissions.
- Select Extension as the client-side component type to be created.
- Select Application Customizer as the extension type to be created.
- Name the extension as PreallocateSpace.
- Provide the description as Avoid page movement.
- Yeoman generator will perform the scaffolding process to generate the solution. The scaffolding process will take a significant amount of time.
-
Once the scaffolding process is completed, lock down the version of the project dependencies by running below command.
npm shrinkwrap - On the command prompt type below command to open the solution in the code editor of your choice.
code .
Implement Application Customizer
Follow the below steps to implement the top content place holder in an application customizer.
- Open file src\extensions\preallocateSpace\PreallocateSpaceApplicationCustomizer.ts
-
To get access to placeholders on the page, use the below imports.
import { BaseApplicationCustomizer, PlaceholderContent, PlaceholderName } from '@microsoft/sp-application-base'; -
Update the interface IPreallocateSpaceApplicationCustomizerProperties to include Top property.
export interface IPreallocateSpaceApplicationCustomizerProperties { Top: string; } -
Implement the OnInit method.
private _topPlaceholder: PlaceholderContent | undefined; @override public onInit(): Promise<void> { Log.info(LOG_SOURCE, `Initialized ${strings.Title}`); // Added to handle possible changes on the existence of placeholders. this.context.placeholderProvider.changedEvent.add(this, this._renderPlaceHolders); // Call render method for generating the HTML elements. this._renderPlaceHolders(); return Promise.resolve(); } -
Implement _renderPlaceHolders method.
private _renderPlaceHolders(): void { // Handling the top placeholder if (!this._topPlaceholder) { this._topPlaceholder = this.context.placeholderProvider.tryCreateContent( PlaceholderName.Top, { onDispose: this._onDispose } ); // The extension should not assume that the expected placeholder is available. if (!this._topPlaceholder) { console.error('The expected placeholder (Top) was not found.'); return; } if (this.properties) { let topString: string = this.properties.Top; if (!topString) { topString = '(Top property was not defined.)'; } if (this._topPlaceholder.domElement) { this._topPlaceholder.domElement.innerHTML = ` <div> <div class="ms-bgColor-themeDark ms-fontColor-white"> <i class="ms-Icon ms-Icon--Info" aria-hidden="true"></i> ${escape(topString)} </div> </div>`; } } } } - Implement _onDispose method.
private _onDispose(): void {
  console.log('[PreallocateSpaceApplicationCustomizer._onDispose] Disposed custom top placeholder.');
}
At this point, we have set up a minimal application customizer to add the placeholder to the top of the SharePoint page. Now, let’s start adding some business logic to it.
Add Processing to an Application Customizer
We will now add business processing to an Application Customizer. Be it any business scenario to implement (for e.g. reading data from SharePoint using REST APIs or maybe accessing some Graph API), it might take a few seconds to process.
Let us implement a method to assume some processing time (e.g. 2 seconds) for the business logic.
public getTopMessage(): Promise<string> {
  return new Promise<string>((resolve, reject): void => {
    setTimeout(() => resolve(this.properties.Top), 2000);
  });
}
This method will return us the text to be added to the Top placeholder. Now, let us use this method inside _renderPlaceHolders.
private _renderPlaceHolders(): void {
  .
  .
  .
    if (this._topPlaceholder.domElement) {
      this.getTopMessage().then((topMessage: string) => {
        this._topPlaceholder.domElement.innerHTML = `
        <div>
          <div class="ms-bgColor-themeDark ms-fontColor-white">
            <i class="ms-Icon ms-Icon--Info" aria-hidden="true"></i> ${topMessage}
          </div>
        </div>`;
      });
    }
  .
  .
  .
}
Deploy an Application Customizer to SharePoint
Deploy the application customizer to SharePoint site by following below steps:
On the command prompt, execute below commands:
- Generate bundles in the dist folder.
gulp bundle --ship - Generate .sppkg file to be deployed in the SharePoint app catalog.
gulp package-solution --ship - Deploy the application customizer app to the SharePoint site.
- Refresh the SharePoint site. You will observe the movement of the page (flickering).
How to avoid the movement of the page?
To pre-allocate space, below HostProperties configuration properties can be used:
- preAllocatedApplicationCustomizerTopHeight - Pre-allocated height for the top placeholder
- preAllocatedApplicationCustomizerBottomHeight - Pre-allocated height for the bottom placeholder
Pre-allocation can be defined either in the elements.xml or in the ClientSideInstance.xml files.
Pre-allocation for site scoped deployment
For site scoped deployment, pre-allocation can be defined as HostProperties entry in elements.xml file under sharepoint\assets folder.
<?xml version="1.0" encoding="utf-8"?>
<Elements xmlns="http://schemas.microsoft.com/sharepoint/">
    <CustomAction
        Title="PreallocateSpace"
        Location="ClientSideExtension.ApplicationCustomizer"
        ClientSideComponentId="d1a63535-2e2a-4cb9-8e78-f29d4743c396"
        ClientSideComponentProperties="{"Top":"Test message"}"
        HostProperties="{"preAllocatedApplicationCustomizerTopHeight":"50","preAllocatedApplicationCustomizerBottomHeight":"50"}">
    </CustomAction>
</Elements>
The above configuration will define the default height to 50 pixels.
Pre-allocation for tenant-wide deployment
For tenant-wide deployment, pre-allocation can be defined as HostProperties entry in ClientSideInstance.xml file under sharepoint\assets folder.
<?xml version="1.0" encoding="utf-8"?>
<Elements xmlns="http://schemas.microsoft.com/sharepoint/">
    <ClientSideComponentInstance
        Title="PreallocateSpace"
        Location="ClientSideExtension.ApplicationCustomizer"
        ComponentId="d1a63535-2e2a-4cb9-8e78-f29d4743c396"
        Properties="{"Top":"Test message"}"
        HostProperties="{"preAllocatedApplicationCustomizerTopHeight":"50","preAllocatedApplicationCustomizerBottomHeight":"50"}">
    </ClientSideComponentInstance>
</Elements>
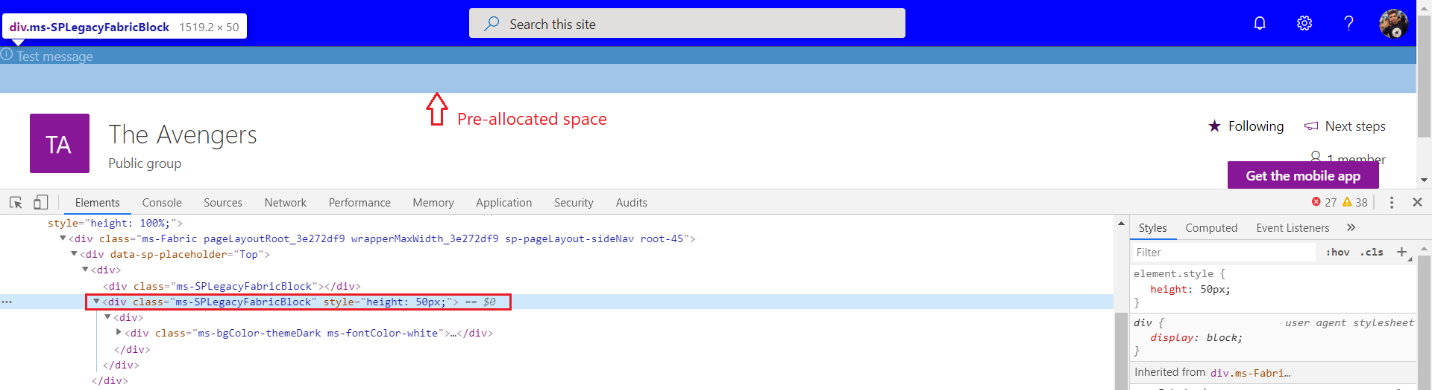
Test the Pre-allocated Space
An application customizer pre-allocates the defined space on the server-side as shown below:
Key Considerations
Below are a few key considerations while pre-allocating the space
- This option is only available in SharePoint Online.
- If you pre-allocate the placeholder place but do not create any placeholder in the code, the server-side allocated space will remain on the page.
- If the pre-allocated height is more, the div will have extra space.
- If the pre-allocated height is less, the div will get compressed.
Summary
SharePoint Framework now allows to pre-allocate space for an application customizer to avoid the flickering behavior by pre-allocating the area on the server-side when the page is rendered. Pre-allocation can be defined as HostProperties configuration property either in the elements.xml or in the ClientSideInstance.xml files.
This content was originally posted here.


Leave a comment