
Create Office 365 Groups with SPFx
Overview
MS Graph APIs offers wide range of capabilities. It can be effectively used to create Office 365 groups from SharePoint Framework solutions. An SPFx web part can be an useful asset to create Office 365 groups right from SharePoint page, instead of navigating to Office 365 admin center.
During this article, we will develop a practical scenario to create Office 365 groups using MS Graph.
Develop SPFx Web Part
-
Open a command prompt. Create a directory for SPFx solution.
md spfx-create-o365-groups -
Navigate to the above created directory.
cd spfx-create-o365-groups -
Run the Yeoman SharePoint generator to create the solution.
yo @microsoft/sharepoint -
Yeoman generator will present you with the wizard by asking questions about the solution to be created.

- Yeoman generator will perform scaffolding process to generate the solution. The scaffolding process will take a significant amount of time.
-
Once the scaffolding process is completed, lock down the version of project dependencies by running below command.
npm shrinkwrap -
On the command prompt type below command to open the solution in the code editor of your choice.
code .
NPM Packages Dependency
Microsoft Graph TypeScript types
The typings will help in providing IntelliSense while writing the code.
On the command prompt, run below command to include the npm package.
npm install @microsoft/microsoft-graph-types --save-dev
@pnp/spfx-controls-react (https://sharepoint.github.io/sp-dev-fx-controls-react/)
On the command prompt, run below command to include the npm package.
npm install @pnp/spfx-controls-react --save
@pnp/sp (https://www.npmjs.com/package/@pnp/sp)
On the command prompt, run below command.
npm i @pnp/logging @pnp/common @pnp/odata @pnp/sp --save
Set Permission Scopes
To consume MS Graph or any third-party REST APIs, the permissions need to be explicitly set in the solution manifest.
Open config\package-solution.json and add below permission scope:
{
  "$schema": "https://developer.microsoft.com/json-schemas/spfx-build/package-solution.schema.json",
  "solution": {
    "name": "spfx-create-o365-groups-client-side-solution",
    "id": "899531e0-cbce-4e4d-a96e-6dd6f18c7e7e",
    "version": "1.0.0.0",
    "includeClientSideAssets": true,
    "isDomainIsolated": false,
    "webApiPermissionRequests": [
      {
        "resource": "Microsoft Graph",
        "scope": "Group.Read.All"
      },
      {
        "resource": "Microsoft Graph",
        "scope": "Group.ReadWrite.All"
      },
      {
        "resource": "Microsoft Graph",
        "scope": "Directory.Read.All"
      },
      {
        "resource": "Microsoft Graph",
        "scope": "Directory.ReadWrite.All"
      },
      {
        "resource": "Microsoft Graph",
        "scope": "Directory.AccessAsUser.All"
      }
    ]
  },
  "paths": {
    "zippedPackage": "solution/spfx-create-o365-groups.sppkg"
  }
}
Define State
Define a state to represent O365 group creation information.
Add a file IO365GroupCreationState.ts file under folder “src\webparts\o365GroupCreation\components\IO365GroupCreationState.ts”.
import { MessageBarType } from 'office-ui-fabric-react';

export interface IO365GroupCreationState {
    name: string;
    description: string;
    visibility: string;
    owners: string[];
    members: string[];
    showMessageBar: boolean;
    messageType?: MessageBarType;
    message?: string;
}
Implement O365 Groups Service
Implement service to perform operations against O365 groups.
- Under src, create a folder named “services”.
-
Add a file O365GroupService.ts file under it.
import { MSGraphClient } from "@microsoft/sp-http"; import { WebPartContext } from "@microsoft/sp-webpart-base"; import { Group } from "@microsoft/microsoft-graph-types"; export class O365GroupService { public context: WebPartContext; public setup(context: WebPartContext): void { this.context = context; } public createGroup(groupName: string, groupDescription: string, groupVisibility: string, groupOwners: string[], groupMembers: string[]): Promise<void> { return new Promise<void>((resolve, reject) => { try { const groupRequest: Group = { displayName: groupName, description: groupDescription, groupTypes: [ "Unified" ], mailEnabled: true, mailNickname: groupName.replace(/\s/g, ""), securityEnabled: false, visibility: groupVisibility }; if (groupOwners && groupOwners.length) { groupRequest['owners@odata.bind'] = groupOwners.map(owner => { return `https://graph.microsoft.com/v1.0/users/${owner}`; }); } if (groupMembers && groupMembers.length) { groupRequest['members@odata.bind'] = groupMembers.map(member => { return `https://graph.microsoft.com/v1.0/users/${member}`; }); } this.context.msGraphClientFactory .getClient() .then((client: MSGraphClient) => { client .api("/groups") .post(groupRequest) .then((groupResponse) => { console.log(groupResponse); resolve(); }); }); } catch (error) { console.error(error); } }); } } const GroupService = new O365GroupService(); export default GroupService; - Under services folder, add a file index.ts.
export * from './O365GroupService';
Consume service from web part
- Open web part file at
src\webparts\o365GroupCreation\O365GroupCreationWebPart.ts. -
Import the service.
import O365GroupService from '../../services/O365GroupService'; - Implement onInit() method to set up the service.
protected onInit(): Promise<void> {
  return super.onInit().then(() => {
    O365GroupService.setup(this.context);
  });
}
Pass the context from web part to React Component
We will have to pass the SharePoint context from our web part to the React component.
- Open React component properties at
src\webparts\o365GroupCreation\components\IO365GroupCreationProps.ts. - Add the below properties.
import { WebPartContext } from '@microsoft/sp-webpart-base';

export interface IO365GroupCreationProps {
  description: string;
  context: WebPartContext;
}
Implement the NewGroup React Component
- Open the React component at
src\webparts\o365GroupCreation\components\O365GroupCreation.tsx. -
Add below imports.
import { TextField } from 'office-ui-fabric-react/lib/TextField'; import { Label } from 'office-ui-fabric-react/lib/Label'; import { ChoiceGroup, IChoiceGroupOption } from 'office-ui-fabric-react/lib/ChoiceGroup'; import { PeoplePicker, PrincipalType, IPeoplePickerUserItem } from "@pnp/spfx-controls-react/lib/PeoplePicker"; import { MessageBar, MessageBarType, IStackProps, Stack } from 'office-ui-fabric-react'; import { autobind } from 'office-ui-fabric-react'; import O365GroupService from '../../../services/O365GroupService'; -
Use the React state.
import { IO365GroupCreationState } from './IO365GroupCreationState'; export default class O365GroupCreation extends React.Component<IO365GroupCreationProps, IO365GroupCreationState> { constructor(props: IO365GroupCreationProps) { super(props); this.state = { name: '', description: '', visibility: 'Public', owners: [], members: [], showMessageBar: false }; } . . . } -
Implement render method to add the UI controls.
public render(): React.ReactElement<IO365GroupCreationProps> { return ( <div className={styles.container}> <div className={styles.row}> { this.state.showMessageBar ? <div className="form-group"> <Stack {...verticalStackProps}> <MessageBar messageBarType={this.state.messageType}>{this.state.message}</MessageBar> </Stack> </div> : null } <div className="form-group"> <TextField label="Name" required onChanged={this.onchangedName} /> </div> <div className="form-group"> <TextField label="Description" required multiline rows={3} onChanged={this.onchangedDescription} /> </div> <div className="form-group"> <Label required={true}>Visibility</Label> <ChoiceGroup defaultSelectedKey="Public" options={[ { key: 'Public', text: 'Public - Anyone can see group content' }, { key: 'Private', text: 'Private - Only members can see group content' } ]} onChange={this.onChangeVisibility} /> </div> <div className="form-group"> <PeoplePicker context={this.props.context} titleText="Owners" personSelectionLimit={3} showHiddenInUI={false} principalTypes={[PrincipalType.User]} selectedItems={this._getPeoplePickerOwners} isRequired={true} /> </div> <div className="form-group"> <PeoplePicker context={this.props.context} titleText="Members" personSelectionLimit={3} showHiddenInUI={false} principalTypes={[PrincipalType.User]} selectedItems={this._getPeoplePickerMembers} isRequired={true} /> </div> <div className={`${styles.buttonRow} form-group`}> <button type="button" className="btn btn-primary" onClick={this.createNewGroup}>Submit</button> </div> </div> </div> ); } - Implement the event handlers for UI controls.
@autobind
private _getPeoplePickerOwners(items: IPeoplePickerUserItem[]) {
  this.setState(() => {
    return {
      ...this.state,
      owners: items.map(x => x.id.replace('i:0#.f|membership|', ''))
    };
  });
}

@autobind
private _getPeoplePickerMembers(items: IPeoplePickerUserItem[]) {
  this.setState(() => {
    return {
      ...this.state,
      members: items.map(x => x.id.replace('i:0#.f|membership|', ''))
    };
  });
}

@autobind
private onchangedName(groupName: any): void {
  this.setState({ name: groupName });
}

@autobind
private onchangedDescription(groupDescription: any): void {
  this.setState({ description: groupDescription });
}

@autobind
private onChangeVisibility(ev: React.FormEvent<HTMLInputElement>, option: IChoiceGroupOption): void {
  this.setState({ visibility: option.key });
}

@autobind
private createNewGroup(): void {
  try {
    O365GroupService.createGroup(this.state.name, this.state.description, this.state.visibility, this.state.owners, this.state.members);

    this.setState({
      message: "Group " + this.state.name + " is created successfully!",
      showMessageBar: true,
      messageType: MessageBarType.success
    });
  } catch (error) {
    this.setState({
      message: "Group " + this.state.name + " creation failed with error: " + error,
      showMessageBar: true,
      messageType: MessageBarType.error
    });
  }
}
Deploy the SPFx Package to SharePoint App Catalog
Follow below steps to deploy the SPFx package (.sppkg) to SharePoint app catalog.
Build minified assets
On the command prompt, type the below command.
gulp bundle --ship
Prepare the package
On the command prompt, type the below command.
gulp package-solution --ship
The .sppkg package will be available inside “sharepoint\solution” folder.
Upload package to app catalog
- Open SharePoint app catalog site.
-
Upload the package to app catalog.

- Click “Deploy”.
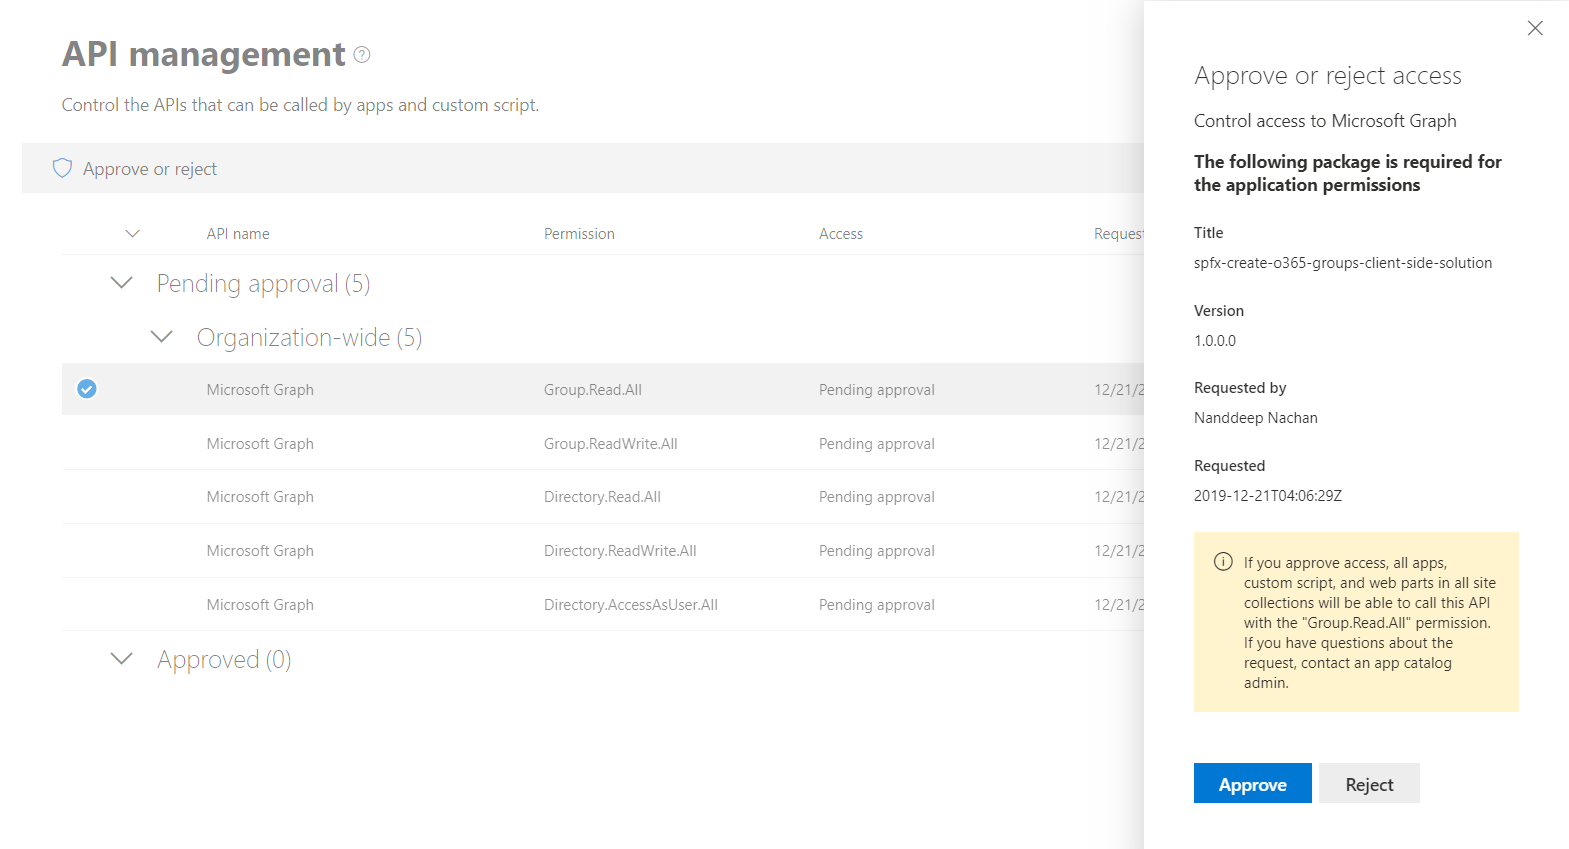
API Management
After deploying the web part, follow the below steps to approve API requests.
- Open SharePoint Admin Center https://[tenant]-admin.sharepoint.com.
- From left navigation, click “API Management”.
- Approve the pending requests.
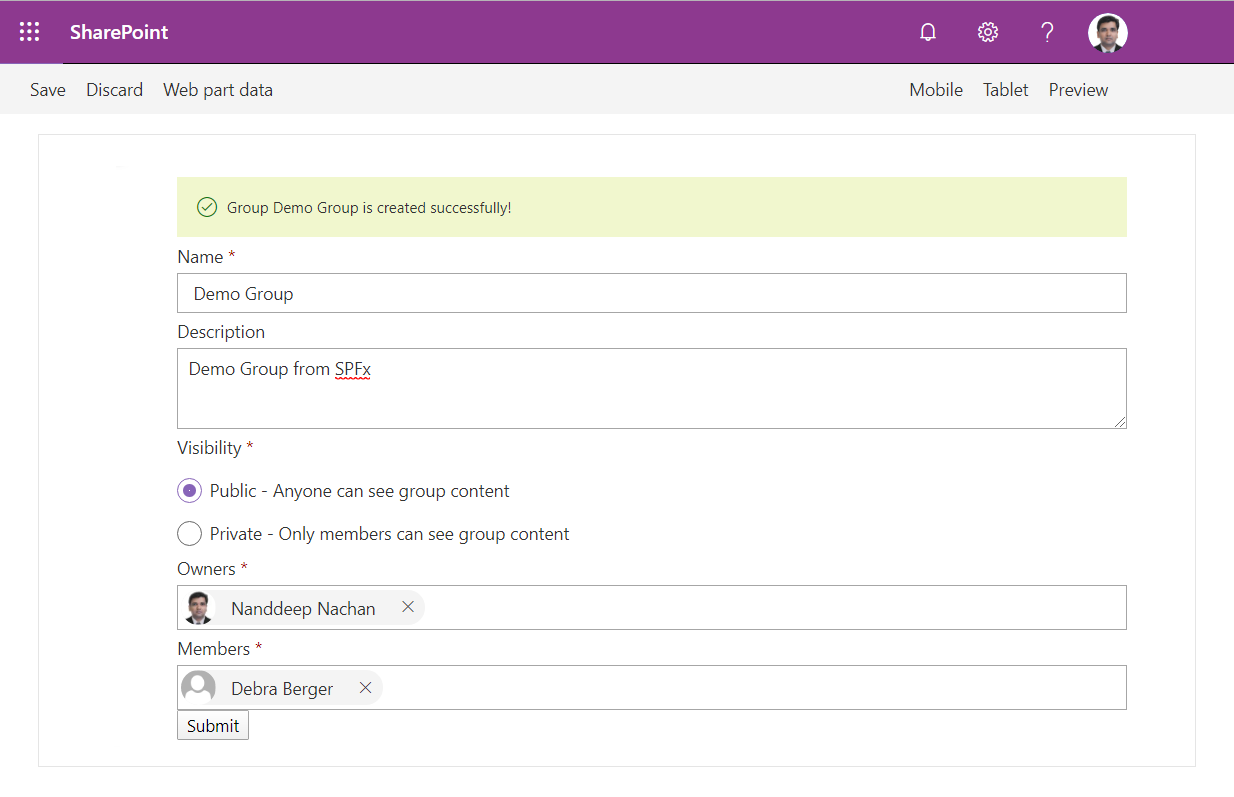
Test the WebPart
- On the command prompt, type “gulp serve”.
- Open SharePoint site.
- Navigate to /_layouts/15/workbench.aspx
- Locate and add the webpart (named O365GroupCreation) to page.
- Fill in the group information.
- Click “Submit”.
Troubleshoot
The page generates an alert “To view the information on this page, you need to verify your identity”, to resolve this add below urls to trusted site in browser.
- https://graph.microsoft.com
- https://.office365.com
- https://.microsoftonline.com
- https://.sharepoint.com
- https://.outlook.com
Summary
Microsoft Graph offers a wide range of APIs to access the content and services provided by Office 365. Creating group by using MS Graph API is one of the business cases supporting it. As this solution uses an application permission, a page hosting this web part has to be carefully exposed to the certain set of users.
This content was originally posted here.


Leave a comment