
SharePoint Framework - Retrieve User Profile Information

Overview
User Profile service in SharePoint is useful to store information related to users. SharePoint out of box provides various user profile properties to denote user attributes (e.g. Id, First Name, Last Name, Manager, etc.). We can also create our own custom user profile properties.
In this article, we will explore how to retrieve the user profile information. We will use ReactJS in this example.
User Profile in SharePoint Online
- Open https://[tenant]-admin.sharepoint.com
-
From left navigation, click user profiles.
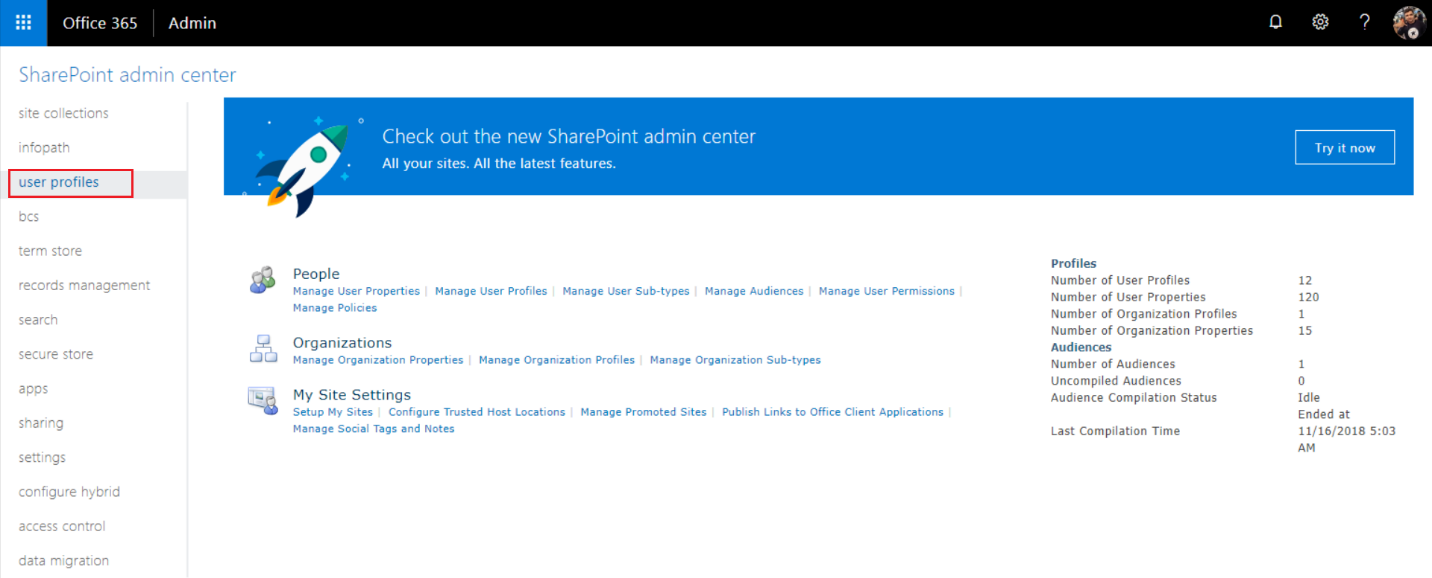
User profile properties and user profiles can be managed from here.
Create SPFx Solution
-
Open the command prompt. Create a directory for SPFx solution.
md spfx-react-userprofile -
Navigate to the above-created directory.
cd spfx-react-userprofile -
Run Yeoman SharePoint Generator to create the solution.
yo @microsoft/sharepoint -
Yeoman Generator will present you with the wizard by asking questions about the solution to be created.
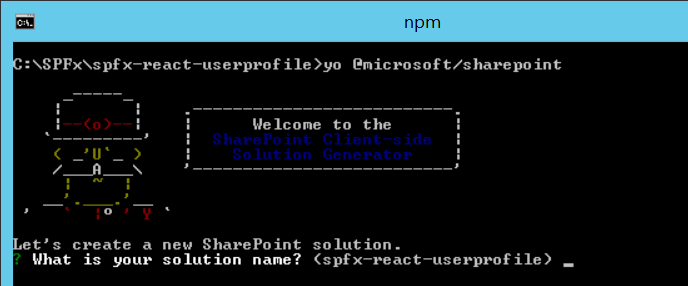
- Solution Name - Hit enter to have the default name (spfx-react-userprofile in this case) or type in any other name for your solution.
- Selected choice - Hit Enter
- Target for component - Here, we can select the target environment where we are planning to deploy the client webpart, i.e., SharePoint Online or SharePoint OnPremise (SharePoint 2016 onwards).
- Selected choice - SharePoint Online only (latest)
- Place of files - We may choose to use the same folder or create a subfolder for our solution.
- Selected choice - Same folder
- Deployment option - Selecting Y will allow the app to deployed instantly to all sites and will be accessible everywhere.
- Selected choice - N (install on each site explicitly)
- Type of client-side component to create - We can choose to create client side webpart or an extension. Choose the webpart option.
- Selected choice - WebPart
- Web part name - Hit enter to select the default name or type in any other name.
- Selected choice - UserProfileViewer
- Web part description - Hit enter to select the default description or type in any other value.
- Selected choice - Fetch user profile values with SPFx
- Framework to use - Select any JavaScript framework to develop the component. Available choices are (No JavaScript Framework, React, and Knockout)
- Selected choice - React
- Solution Name - Hit enter to have the default name (spfx-react-userprofile in this case) or type in any other name for your solution.
- Yeoman generator will perform scaffolding process to generate the solution. The scaffolding process will take a significant amount of time.
-
Once the scaffolding process is completed, lock down the version of project dependencies by running below command
npm shrinkwrap -
On the command prompt type the below command to open the solution in the code editor of your choice.
code .
Model for User Profile
Let us start by defining the model for user profile properties.
Add a file IUserProfile.ts under “src\webparts\userProfileViewer\components" folder with below content.
export interface IUserProfile {
    FirstName: string;
    LastName: string;
    Email: string;
    Title: string;
    WorkPhone: string;
    DisplayName: string;
    Department: string;
    PictureURL: string;
    UserProfileProperties: Array<any>;
}
Update IUserProfileViewerProps.ts under “src\webparts\userProfileViewer\components" folder to include below properties.
import { ServiceScope } from '@microsoft/sp-core-library';

export interface IUserProfileViewerProps {
  description: string;
  userName: string;
  serviceScope: ServiceScope;
}
Define State
Add file IUserProfileViewerState.ts under foler “src\webparts\userProfileViewer\components".
import { IUserProfile } from '../components/IUserProfile';

export interface IUserProfileViewerState {
    userProfileItems: IUserProfile;
}
Define Service
Now, we will define a service to fetch the user profile values.
- In the solution, create a new folder services at same level of components folder.
-
Create new file UserProfileService.ts under it.
 import { ServiceScope, ServiceKey } from "@microsoft/sp-core-library";
 import { IUserProfile } from '../components/IUserProfile';
 import { IDataService } from './IDataService';
 import { SPHttpClient, SPHttpClientResponse } from '@microsoft/sp-http';
 import { PageContext } from '@microsoft/sp-page-context';

 export class UserProfileService implements IDataService {
     public static readonly serviceKey: ServiceKey<IDataService> = ServiceKey.create<IDataService>('userProfle:data-service', UserProfileService);
     private _spHttpClient: SPHttpClient;
     private _pageContext: PageContext;
     private _currentWebUrl: string;

     constructor(serviceScope: ServiceScope) {
         serviceScope.whenFinished(() => {
             // Configure the required dependencies
             this._spHttpClient = serviceScope.consume(SPHttpClient.serviceKey);
             this._pageContext = serviceScope.consume(PageContext.serviceKey);
             this._currentWebUrl = this._pageContext.web.absoluteUrl;
         });
     }

     public getUserProfileProperties(): Promise<IUserProfile> {
         return new Promise<IUserProfile>((resolve: (itemId: IUserProfile) => void, reject: (error: any) => void): void => {
             this.readUserProfile()
               .then((orgChartItems: IUserProfile): void => {
                 resolve(this.processUserProfile(orgChartItems));
               });
           });
     }

     private readUserProfile(): Promise<IUserProfile> {
         return new Promise<IUserProfile>((resolve: (itemId: IUserProfile) => void, reject: (error: any) => void): void => {
           this._spHttpClient.get(`${this._currentWebUrl}/_api/SP.UserProfiles.PeopleManager/getmyproperties`,
           SPHttpClient.configurations.v1,
           {
             headers: {
               'Accept': 'application/json;odata=nometadata',
               'odata-version': ''
             }
           })
           .then((response: SPHttpClientResponse): Promise<{ value: IUserProfile }> => {
             return response.json();
           })
           .then((response: { value: IUserProfile }): void => {
             //resolve(response.value);
             var output: any = JSON.stringify(response);
             resolve(output);
           }, (error: any): void => {
             reject(error);
           });
         });
     }

     private processUserProfile(orgChartItems: any): any {
         return JSON.parse(orgChartItems);
     }
 }
Code the WebPart
Open UserProfileViewer.tsx under “src\webparts\userProfileViewer\components" folder.
Implement componentWillMount method.
public componentWillMount(): void {
  let serviceScope: ServiceScope = this.props.serviceScope;
  this.dataCenterServiceInstance = serviceScope.consume(UserProfileService.serviceKey);

  this.dataCenterServiceInstance.getUserProfileProperties().then((userProfileItems: IUserProfile) => {
    for (let i: number = 0; i < userProfileItems.UserProfileProperties.length; i++) {
      if (userProfileItems.UserProfileProperties[i].Key == "FirstName") {
        userProfileItems.FirstName = userProfileItems.UserProfileProperties[i].Value;
      }

      if (userProfileItems.UserProfileProperties[i].Key == "LastName") {
        userProfileItems.LastName = userProfileItems.UserProfileProperties[i].Value;
      }

      if (userProfileItems.UserProfileProperties[i].Key == "WorkPhone") {
        userProfileItems.WorkPhone = userProfileItems.UserProfileProperties[i].Value;
      }

      if (userProfileItems.UserProfileProperties[i].Key == "Department") {
        userProfileItems.Department = userProfileItems.UserProfileProperties[i].Value;
      }

      if (userProfileItems.UserProfileProperties[i].Key == "PictureURL") {
        userProfileItems.PictureURL = userProfileItems.UserProfileProperties[i].Value;
      }
    }

    this.setState({ userProfileItems: userProfileItems });
  });
}
Implement render method to display user profile values.
public render(): React.ReactElement<IUserProfileViewerProps> {
  return (
    <div className={ styles.userProfileViewer }>
      <div className={ styles.container }>
        <div className={ styles.row }>
          <div className={ styles.column }>
            <span className={ styles.title }>Welcome to SharePoint!</span>
            <p className={ styles.subTitle }>Fetch User Profile Properties</p>

            <img src={this.state.userProfileItems.PictureURL}></img>

            <p>
              Name: {this.state.userProfileItems.LastName}, {this.state.userProfileItems.FirstName}
            </p>

            <p>
              WorkPhone: {this.state.userProfileItems.WorkPhone}
            </p>

            <p>
              Department: {this.state.userProfileItems.Department}
            </p>
          </div>
        </div>
      </div>
    </div>
  );
}
Test the WebPart
- On the command prompt, type
gulp serve. - Open SharePoint site.
- Navigate to /_layouts/15/workbench.aspx
- Add the webpart to page.
- The web part should display the information of current logged-in user.
Summary
User profile information can be displayed in SharePoint Framework webpart using the out of box available REST API.
This content was originally posted here.


Leave a comment