
SharePoint Framework – Call Azure AD Secured Function

Overview
Azure functions are helpful to perform processing outside of SharePoint. In the previous article Secure Azure Function with Azure AD, we had explored an option to secure Azure function with Azure AD.
In this article, we will explore on how call secured Azure function with Azure AD from SharePoint framework webpart.
Develop SharePoint Framework Web Part
-
Open command prompt. Create a directory for SPFx solution.
md spfx-call-secure-azure-function -
Navigate to above created directory.
cd spfx-call-secure-azure-function -
Run Yeoman SharePoint Generator to create the solution.
yo @microsoft/sharepoint -
Yeoman generator will present you with the wizard by asking questions about the solution to be created.
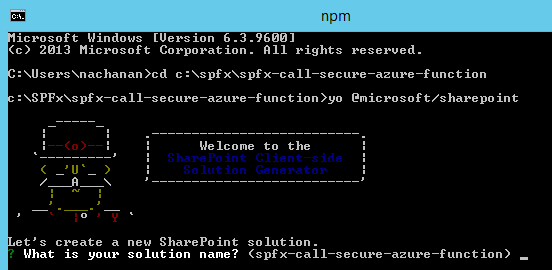
- Solution Name: Hit enter to have default name (spfx-call-secure-azure-function in this case) or type in any other name for your solution.
- Selected choice: Hit enter
- Target for component: Here we can select the target environment where we are planning to deploy the client webpart i.e. SharePoint Online or SharePoint OnPremise (SharePoint 2016 onwards).
- Selected choice: SharePoint Online only (latest)
- Place of files: We may choose to use the same folder or create a subfolder for our solution.
- Selected choice: Same folder
- Deployment option: Selecting Y will allow the app to deployed instantly to all sites and will be accessible everywhere.
- Selected choice: N (install on each site explicitly)
- Type of client-side component to create: We can choose to create client side webpart or an extension. Choose webpart option.
- Selected choice: WebPart
- Web part name: Hit enter to select the default name or type in any other name.
- Selected choice: SecureAzureFunctionCallerWebPart
- Web part description: Hit enter to select the default description or type in any other value.
- Selected choice: Call Secure Azure Function from SPFx
- Framework to use: Select any JavaScript framework to develop the component. Available choices are (No JavaScript Framework, React, and Knockout)
- Selected choice: No JavaScript Framework
- Solution Name: Hit enter to have default name (spfx-call-secure-azure-function in this case) or type in any other name for your solution.
- Yeoman generator will perform scaffolding process to generate the solution. The scaffolding process will take significant amount of time.
-
Once the scaffolding process is completed, lock down the version of project dependencies by running below command.
npm shrinkwrap -
On the command prompt type below command to open the solution in code editor of your choice.
code .
Set Permissions to SPFx WebPart
We will need to set permissions on SPFx webpart so that it can access the resources using Azure function.
- Open “config/package-solution.json” file.
-
Add webApiPermissionRequests property.
 {
   "$schema": "https://developer.microsoft.com/json-schemas/spfx-build/package-solution.schema.json",
   "solution": {
     "name": "spfx-call-secure-azure-function-client-side-solution",
     "id": "54da8bb1-cbe1-45b9-9b89-18ddd60f4b6f",
     "version": "1.0.0.0",
     "includeClientSideAssets": true,
     "isDomainIsolated": false,
     "webApiPermissionRequests": [
       {
         "resource": "Secure API for SPFx",
         "scope": "user_impersonation"
       },
       {
         "resource": "Windows Azure Active Directory",
         "scope": "User.Read"
       }
     ]
   },
   "paths": {
     "zippedPackage": "solution/spfx-call-secure-azure-function.sppkg"
   }
 }
In the above config file:
- Specify name of Azure AD App registration as resource.
- Specify scope as user_impersonation, since we will make a call on behalf of current user.
Code the webpart
- Open SecureAzureFunctionCallerWebPartWebPart.ts under “\src\webparts\secureAzureFunctionCallerWebPart" folder.
-
Add below imports.
import { AadHttpClient, HttpClientResponse } from '@microsoft/sp-http'; -
Update render() method as below.
 public render(): void {
   this.domElement.innerHTML = `
     <div class="${ styles.secureAzureFunctionCallerWebPart }">
       <div class="${ styles.container }">
         <div class="${ styles.row }">
           <div class="${ styles.column }">
             <span class="${ styles.title }">Welcome to SharePoint!</span>
             <p class="${ styles.subTitle }">Current user claims from Azure function</p>
           </div>
         </div>
       </div>
     </div>
     <div class="${styles.tableContainer}">
       <table class='claimsTable'>
       </table>
     </div>
   `;

   this.context.aadHttpClientFactory
     .getClient('https://tenant.onmicrosoft.com/cf981eac-50dc-4221-8882-515a4d31328d')
       .then((client: AadHttpClient): void => {
         client
           .get('https://spfxsecurecaller.azurewebsites.net/api/UserInformation', AadHttpClient.configurations.v1)
           .then((response: HttpClientResponse): Promise<JSON> => {
             return response.json();
           })
           .then((responseJSON: JSON): void => {
             // Render JSON in table
             var claimsTable = this.domElement.getElementsByClassName("claimsTable")[0];

             for (var key in responseJSON) {
               var trElement = document.createElement("tr");
               trElement.innerHTML = `<td class="${styles.tableCell}">${key}</td><td class="${styles.tableCell}">${responseJSON[key]}</td>`;
               claimsTable.appendChild(trElement);
             }
           });
       });
 }
Package the solution
-
Run below command to build the solution.
gulp build -
Run below command to minify the required assets
gulp bundle -
Run below command to create the solution package (sppkg) in
sharepoint\solutionfolder.gulp package-solution -
Start local debugging by running below command:
gulp serve --nobrowser -
Upload the .sppkg file from the sharepoint/solution folder to the App Catalog.
Grant Permission Test the WebPart
- Open SharePoint Admin Center (https://[tenant]-admin.sharepoint.com)
-
Click Try it now.

-
From left navigation, click API Management.
- Select the pending approvals one by one.
- From top, click Approve or reject.
- Click Approve.
Manage permissions with PowerShell
We can also use SharePoint Online Management Shell to manage permission requests in SharePoint online.
Type below command to connect to SharePoint Online. Enter the credentials when prompted.
Connect-SPOService -Url "https://[tenant]-admin.sharepoint.com"
Use below command to view all pending permission requests
Get-SPOTenantServicePrincipalPermissionRequests
Use below command to approve the specific permission request.
Approve-SPOTenantServicePrincipalPermissionRequest -RequestId <Guid>
Summary
Secured Azure function with Azure AD can be called from SharePoint Framework webpart. It needs to setup the permission request in order to access the required resources.
This content was originally posted here.


Leave a comment