
Using OpenAI APIs in Bots with Teams Toolkit
Overview
Teams Toolkit provides one of the simplest yet powerful ways to develop apps for Microsoft Teams. It supports developers in all aspects of the app lifecycle including development, debugging, and deployment.
In this article, we will explore adding OpenAI API capabilities to bots created with Teams Toolkit with easy-to-follow and step-by-step instructions.
Teams Toolkit Overview
Teams Toolkit is available as an extension for Visual Studio Code and Visual Studio 2022 to help developers create, debug, and deploy Microsoft Teams apps.
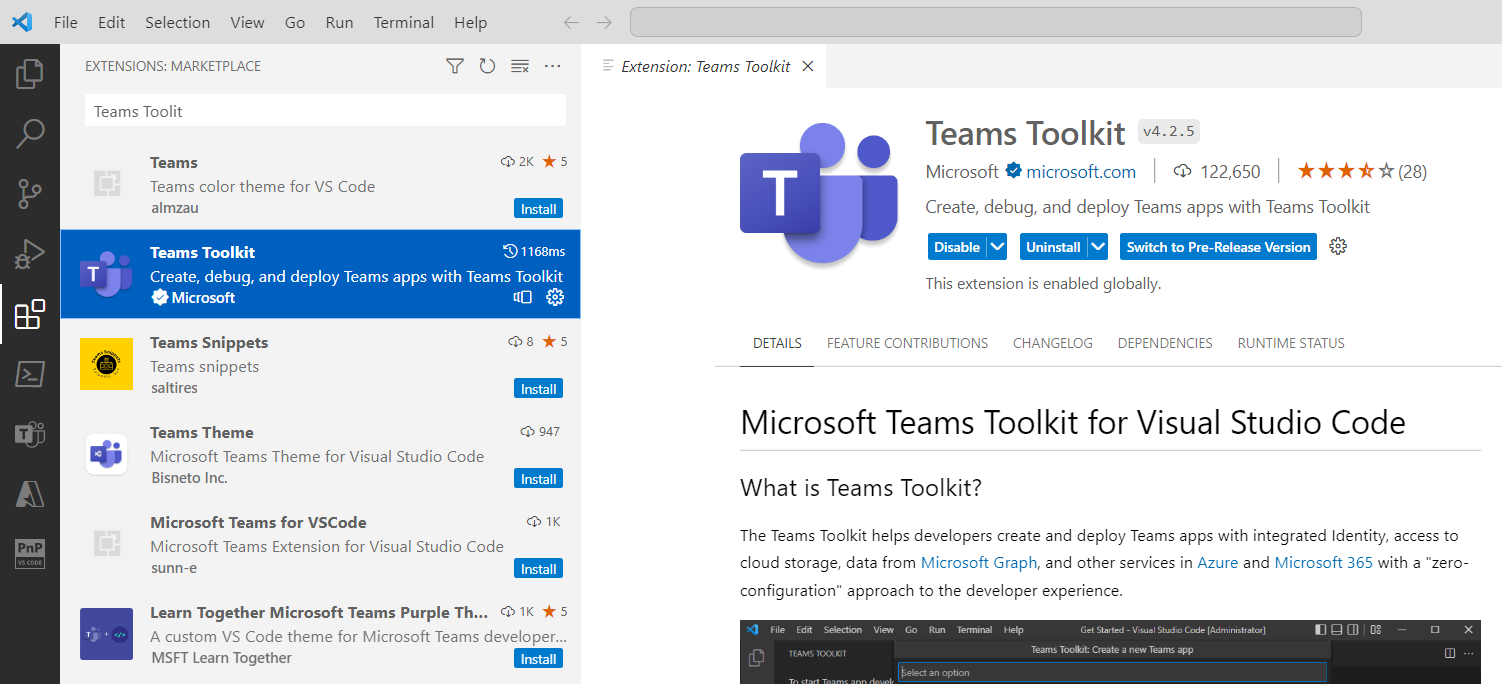
In Visual Studio Code, it can be installed as an extension. Follow the below steps to install:
- Open Visual Studio Code.
- Click View > Extensions.
-
Find and install Teams Toolkit.
Create a Bot solution
Follow the steps below to create a bot solution with Teams Toolkit.
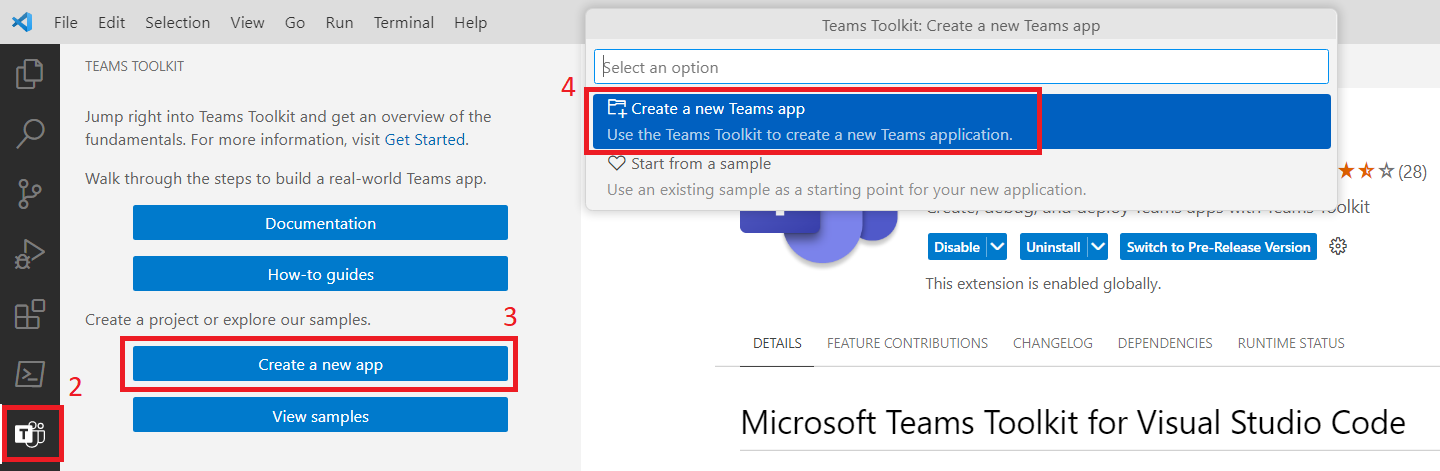
- Open Visual Studio Code.
- From the left menu, click Teams Toolkit.
- Choose to Create a new app.
-
Select an option: Create a new Teams app.
-
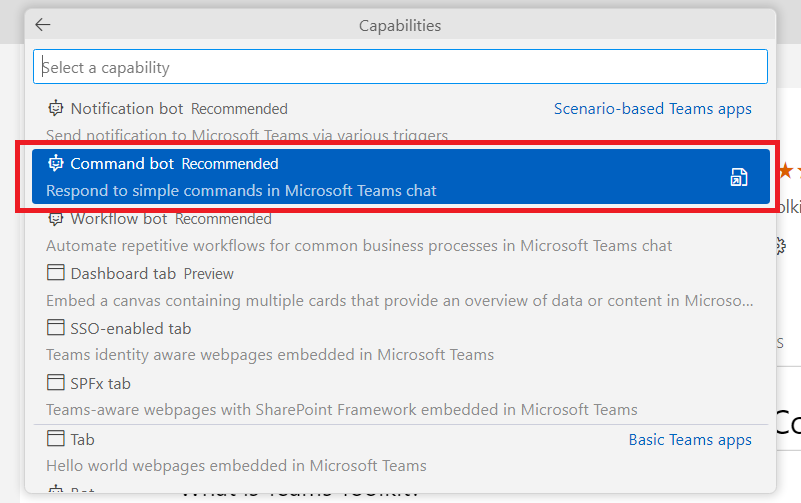
Select Command bot to create.
- Choose a programming language as TypeScript.
- Select a folder location to scaffold the project.
- Enter the Application Name as OpenAIChatBot.
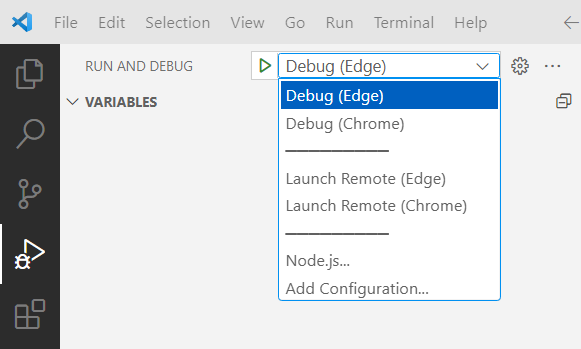
Once the project is scaffolded, you can select Run and Debug from the left menu. Choose the run profile and test the bot solution.
OpenAI npm package
We will use the OpenAI npm package available at https://www.npmjs.com/package/openai in this solution. The OpenAI Node.js library provides convenient access to the OpenAI API from Node.js applications.
Install the package by running the below command:
npm install openai
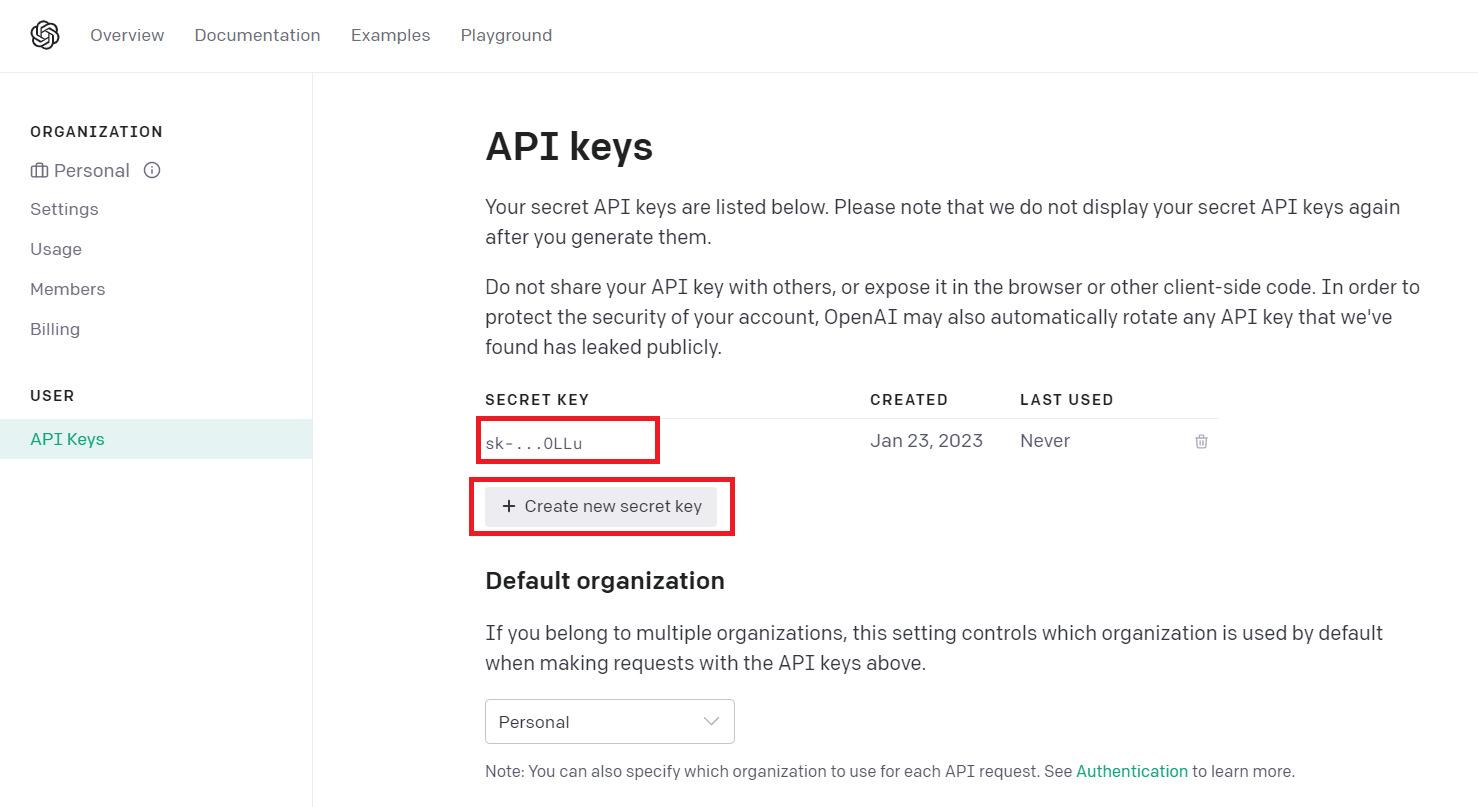
Get the OpenAI API Key
Follow the below steps to get the API key to work with Open AI APIs.
-
Navigate to OpenAI. Sign up, or register to proceed.
-
From your profile, select View API Keys.

-
Click + Create new secret key to create one. Note down the secret key for future use.
We will store the API Key in our solution as a configuration in the bot\src\internal\config.ts file.
const config = {
  botId: process.env.BOT_ID,
  botPassword: process.env.BOT_PASSWORD,
  openAIAPIKey: "***************"
};

export default config;
Create Command Handler
We will start by creating a new command handler as openAIChatCommandHandler.ts under bot\src\ path with the below code.
import { Activity, CardFactory, MessageFactory, TurnContext } from "botbuilder";
import { CommandMessage, TeamsFxBotCommandHandler, TriggerPatterns } from "@microsoft/teamsfx";
import { AdaptiveCards } from "@microsoft/adaptivecards-tools";
import helloWorldCard from "./adaptiveCards/helloworldCommand.json";
import { CardData } from "./cardModels";
import config from "./internal/config";
import { Configuration, OpenAIApi } from "openai";

export class OpenAIChatCommandHandler implements TeamsFxBotCommandHandler {
    triggerPatterns: TriggerPatterns = "openAIChat";

    async handleCommandReceived(context: TurnContext, message: CommandMessage): Promise<string | void | Partial<Activity>> {
        console.log(`Bot received message: ${message.text}`);

        const configuration = new Configuration({
            apiKey: config.openAIAPIKey,
        });
        const openai = new OpenAIApi(configuration);

        // Exclude the trigger pattern from the received message
        var messageText = message.text.replace("openAIChat ", "");
        const completion = await openai.createCompletion({
            model: "text-davinci-003",
            prompt: messageText,
        });

        // Render your adaptive card for reply message
        const cardData: CardData = {
            title: "Hello from OpenAI",
            body: completion.data.choices[0].text,
        };

        const cardJson = AdaptiveCards.declare(helloWorldCard).render(cardData);
        return MessageFactory.attachment(CardFactory.adaptiveCard(cardJson));
    }
}
Now, add the newly created command handler to bot\src\internal\initialize.ts.
.
.
.
export const commandBot = new ConversationBot({
  // The bot id and password to create CloudAdapter.
  // See https://aka.ms/about-bot-adapter to learn more about adapters.
  adapterConfig: {
    MicrosoftAppId: config.botId,
    MicrosoftAppPassword: config.botPassword,
    MicrosoftAppType: "MultiTenant",
  },
  command: {
    enabled: true,
    commands: [new HelloWorldCommandHandler(), new OpenAIChatCommandHandler()],
  },
});
To make our new command available to the users, we need to add it under bots > commandLists > commands section of templates\appPackage\manifest.template.json.
{
    "$schema": "https://developer.microsoft.com/en-us/json-schemas/teams/v1.14/MicrosoftTeams.schema.json",
    "manifestVersion": "1.14",
    "version": "1.0.0",
    "id": "",
    "packageName": "com.microsoft.teams.extension",
    "developer": {
        "name": "Teams App, Inc.",
        "websiteUrl": "https://www.example.com",
        "privacyUrl": "https://www.example.com/termofuse",
        "termsOfUseUrl": "https://www.example.com/privacy"
    },
    "icons": {
        "color": "",
        "outline": ""
    },
    "name": {
        "short": "",
        "full": ""
    },
    "description": {
        "short": "",
        "full": ""
    },
    "accentColor": "#FFFFFF",
    "bots": [
        {
            "botId": "",
            "scopes": [
                "personal",
                "team",
                "groupchat"
            ],
            "supportsFiles": false,
            "isNotificationOnly": false,
            "commandLists": [
                {
                    "scopes": [
                        "personal",
                        "team",
                        "groupchat"
                    ],
                    "commands": [
                        {
                            "title": "helloWorld",
                            "description": "A helloworld command to send a welcome message"
                        },
                        {
                            "title": "openAIChat",
                            "description": "An openAIChat command to start the OpenAI conversation"
                        }
                    ]
                }
            ]
        }
    ],
    "composeExtensions": [],
    "configurableTabs": [],
    "staticTabs": [],
    "permissions": [
        "identity",
        "messageTeamMembers"
    ],
    "validDomains": [
        ""
    ]
}
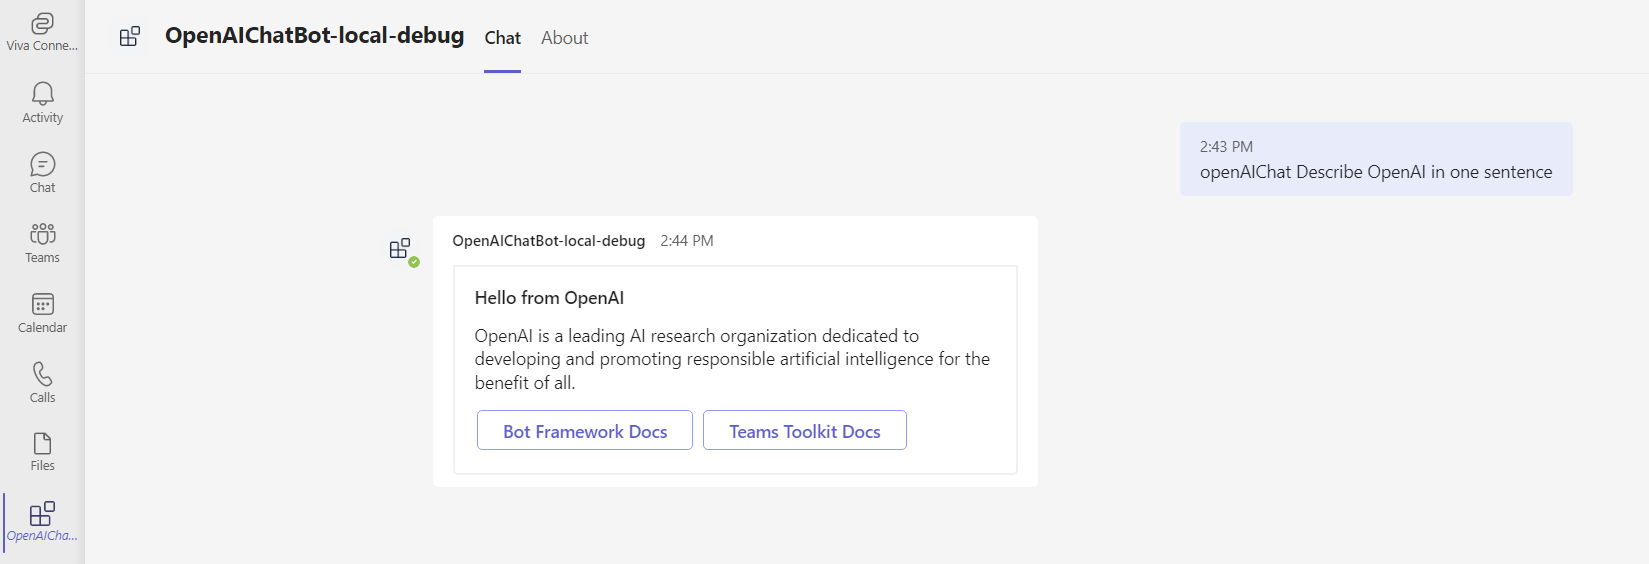
Test the bot
From the Visual Studio Code, select Run and Debug from the left menu. Choose the run profile and test the bot solution.
Summary
OpenAI API can be easily used for bots with Teams Toolkit to provide end-users with the answers they are looking for.
Code Download
The code developed during this article can be found here.


Leave a comment