
Develop Bots for MS Teams with Bot Builder SDK v4
Overview
MS Teams supports integration with various apps and services. Bot is one of them. Both v3 and v4 bots built on the Bot Framework work well with MS Teams. All new development should be targeting the Bot Builder v4 SDK. Bots can be developed using .NET or Node.js.
In this article, we will develop a bot framework bot and extend it to MS Teams. Please follow my previous article Getting Started with MS Teams Development to setup your development environment.
Visual Studio Bot Template
The Microsoft Bot Framework v4 Templates for Visual Studio can be downloaded from here (https://marketplace.visualstudio.com/items?itemName=BotBuilder.botbuilderv4). It is available as a VSIX package. It helps to build new conversational AI bots using the Microsoft Bot Framework v4. Both v3 and v4 bots built on the Bot Framework work well with MS teams.
Once installed, the Bot Framework project creation option will be available for new project creation from Visual Studio.
Develop an Echo Bot
We will create a simple echo Bot in MS Teams. Follow below steps to start developing a Bot.
- Open Visual Studio 2017 as an administrator.
- Click File > New > Project.
-
Under Visual C#, select Bot Framework > Echo Bot (Bot Framework v4).
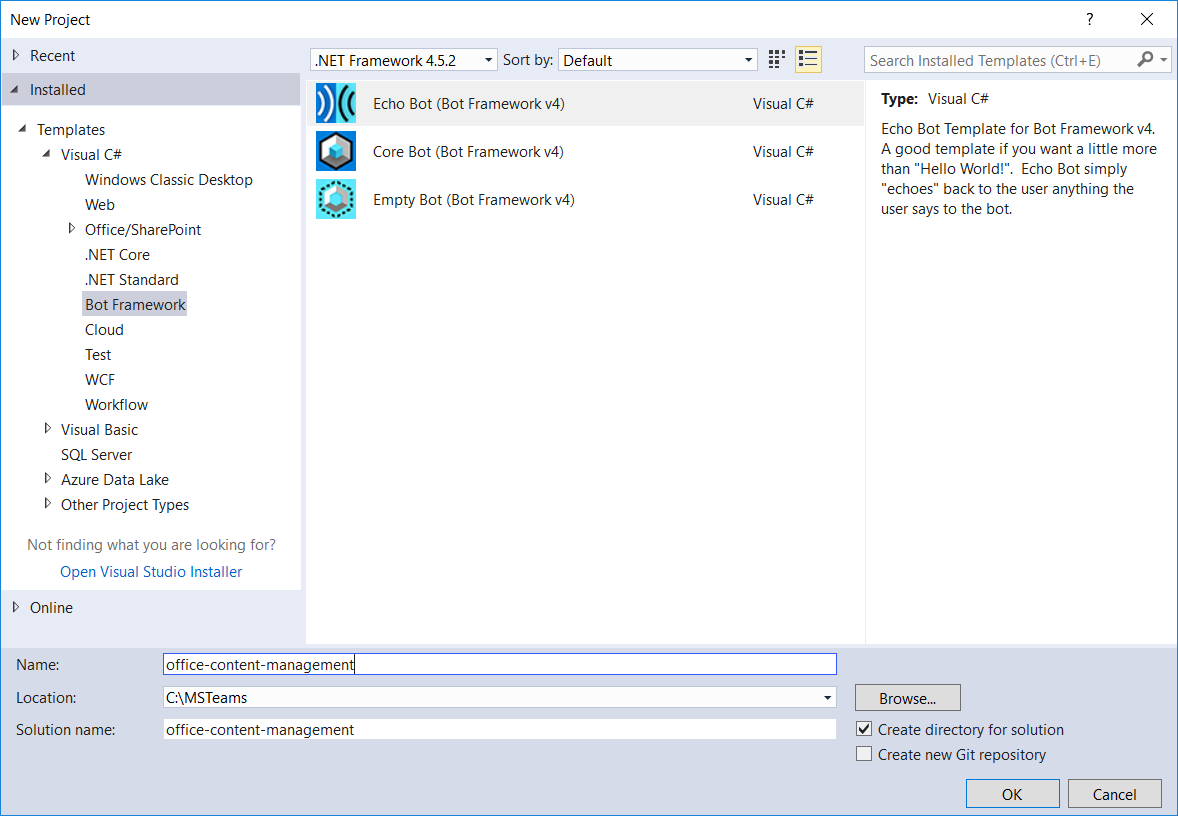
- Click OK.
- Build the solution. This will download all referenced NuGet packages.
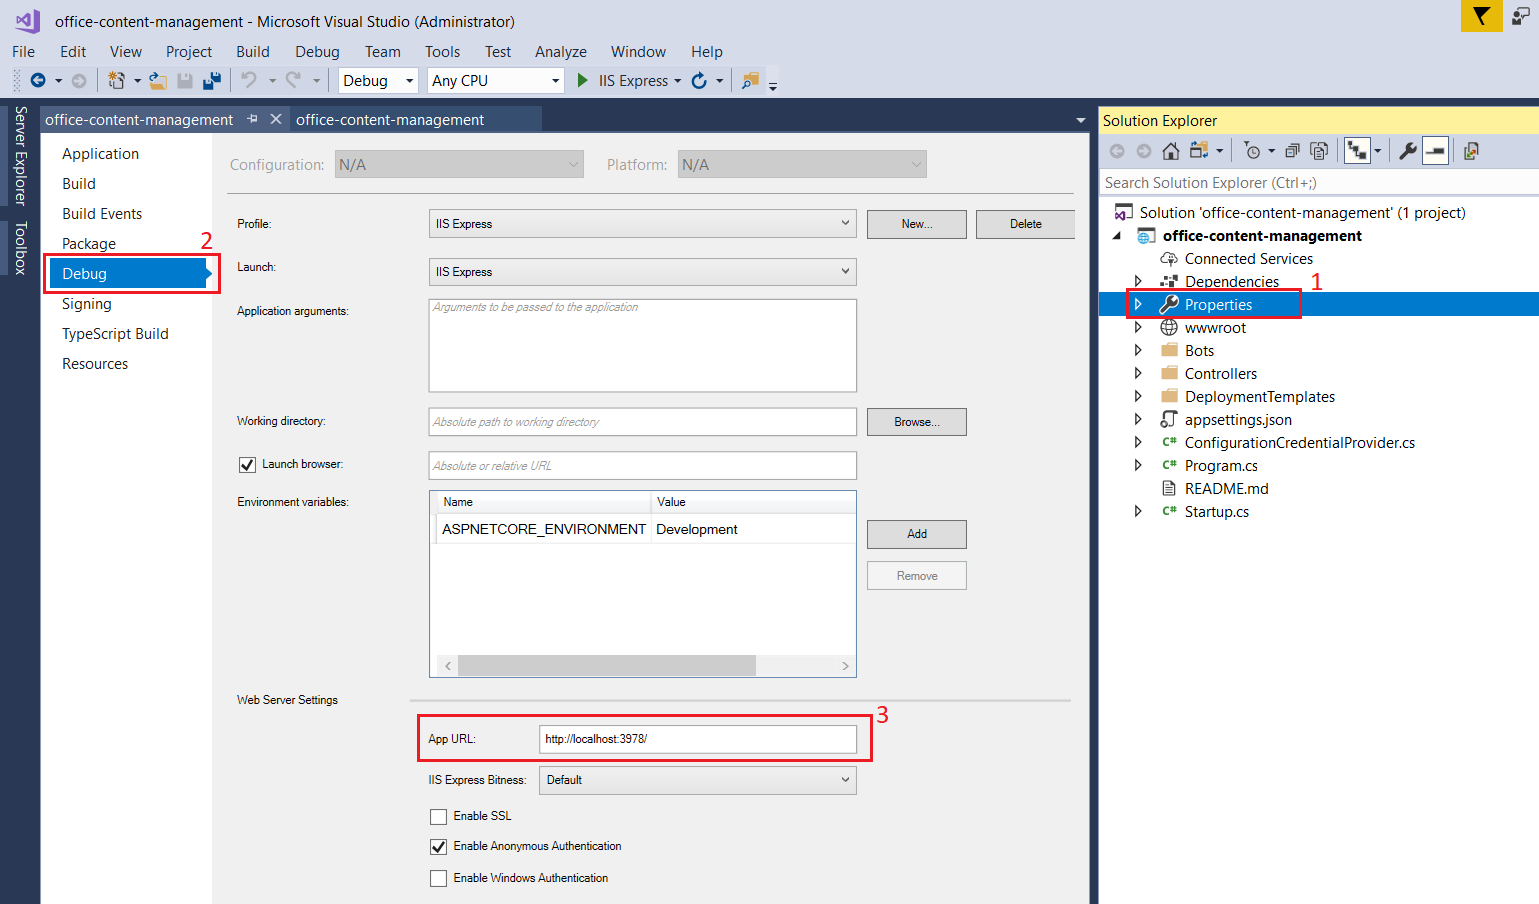
- Open Project properties.
- Under Debug, note down the App URL.
Run the ngrok
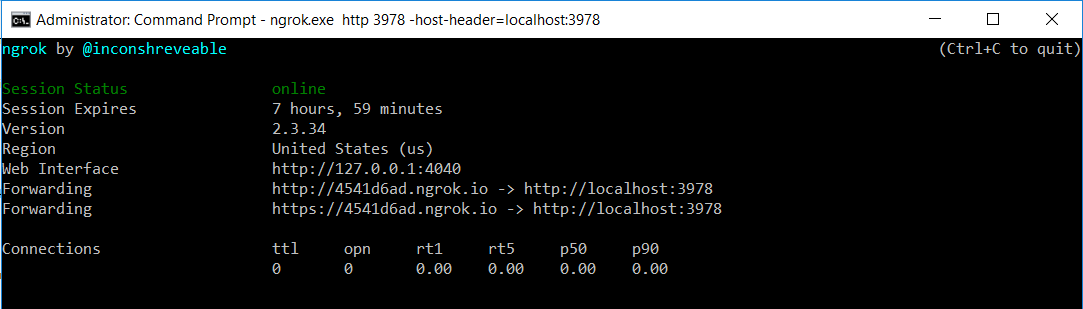
Ngrok is a free program that exposes a process running on your localhost to the public internet. Run the ngrok secure tunnel application by executing below steps.
- On the command prompt, navigate to ngrok.exe location.
- Execute below command.
ngrok.exe http [port] -host-header=localhost:[port]
Replace [port] with the port mentioned in the App URL of solution.
E.g.:
ngrok.exe http 3978 -host-header=localhost:3978
Register Bot in MS Azure
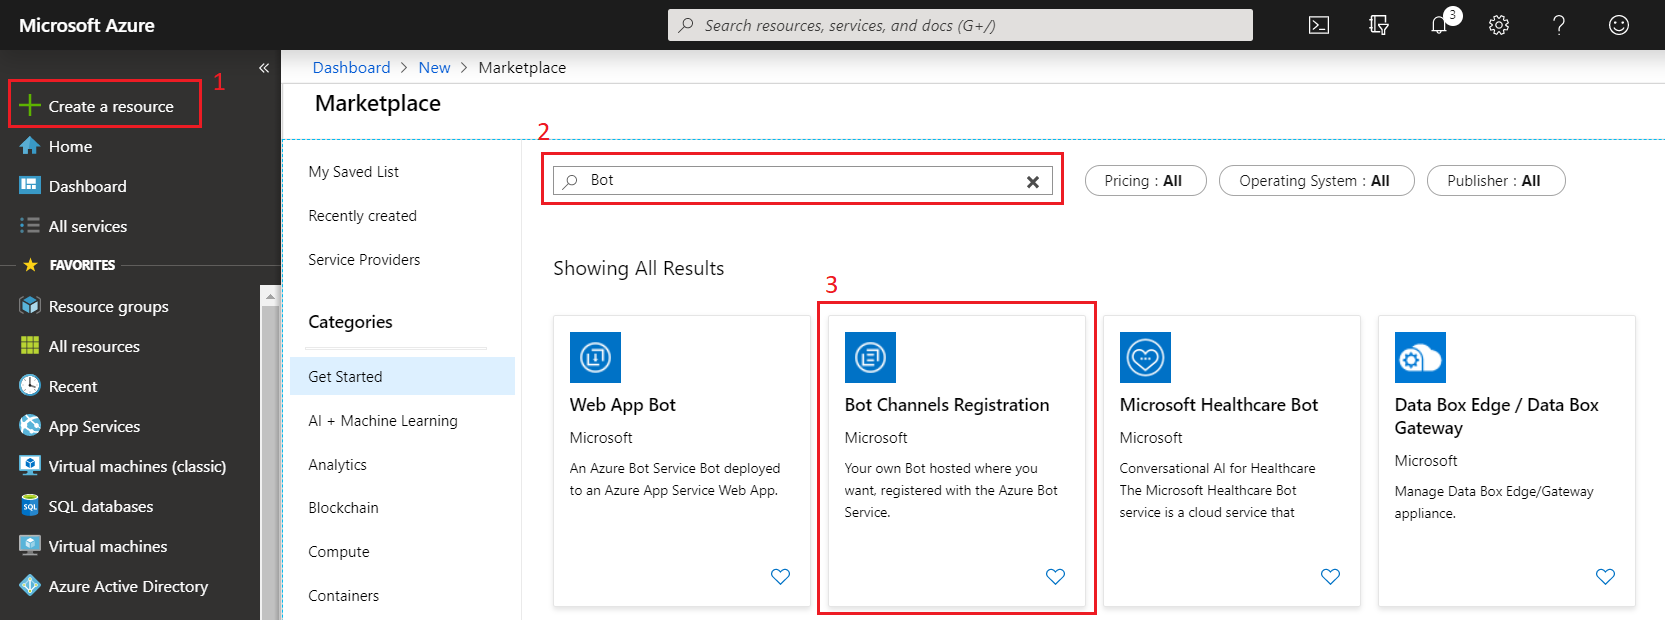
- Open MS Azure portal (https://portal.azure.com)
- Click Create a resource.
- Search for Bot in the marketplace.
-
Select Bot Channels Registration.
- Click Create.
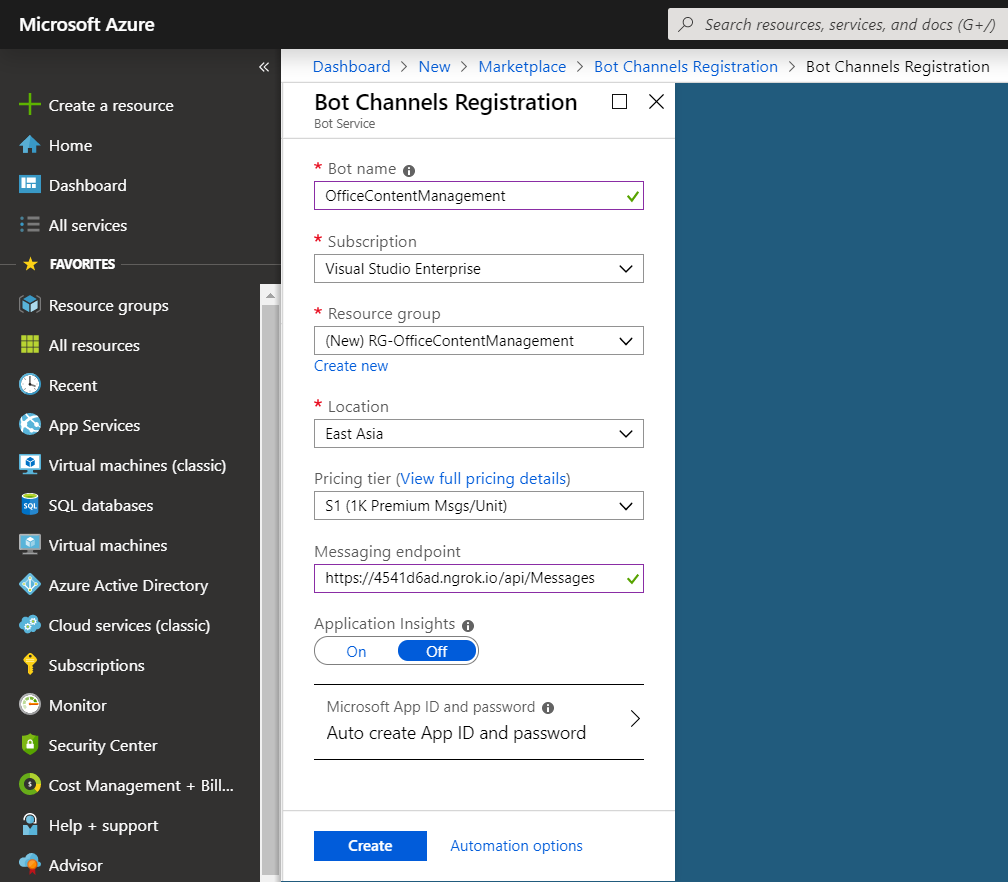
- Fill in the form details.
-
For Messaging endpoint, specify below value.
https://[ngrok-address].ngrok.io/api/MessagesReplace token
[ngrok-address]with forwarding address from ngrok window. (e.g. https://4541d6ad.ngrok.io) -
Choose Auto create App ID and password.
- Click Create.
- Navigate to the resource, when created.
-
Under Bot Management section, click Channels.
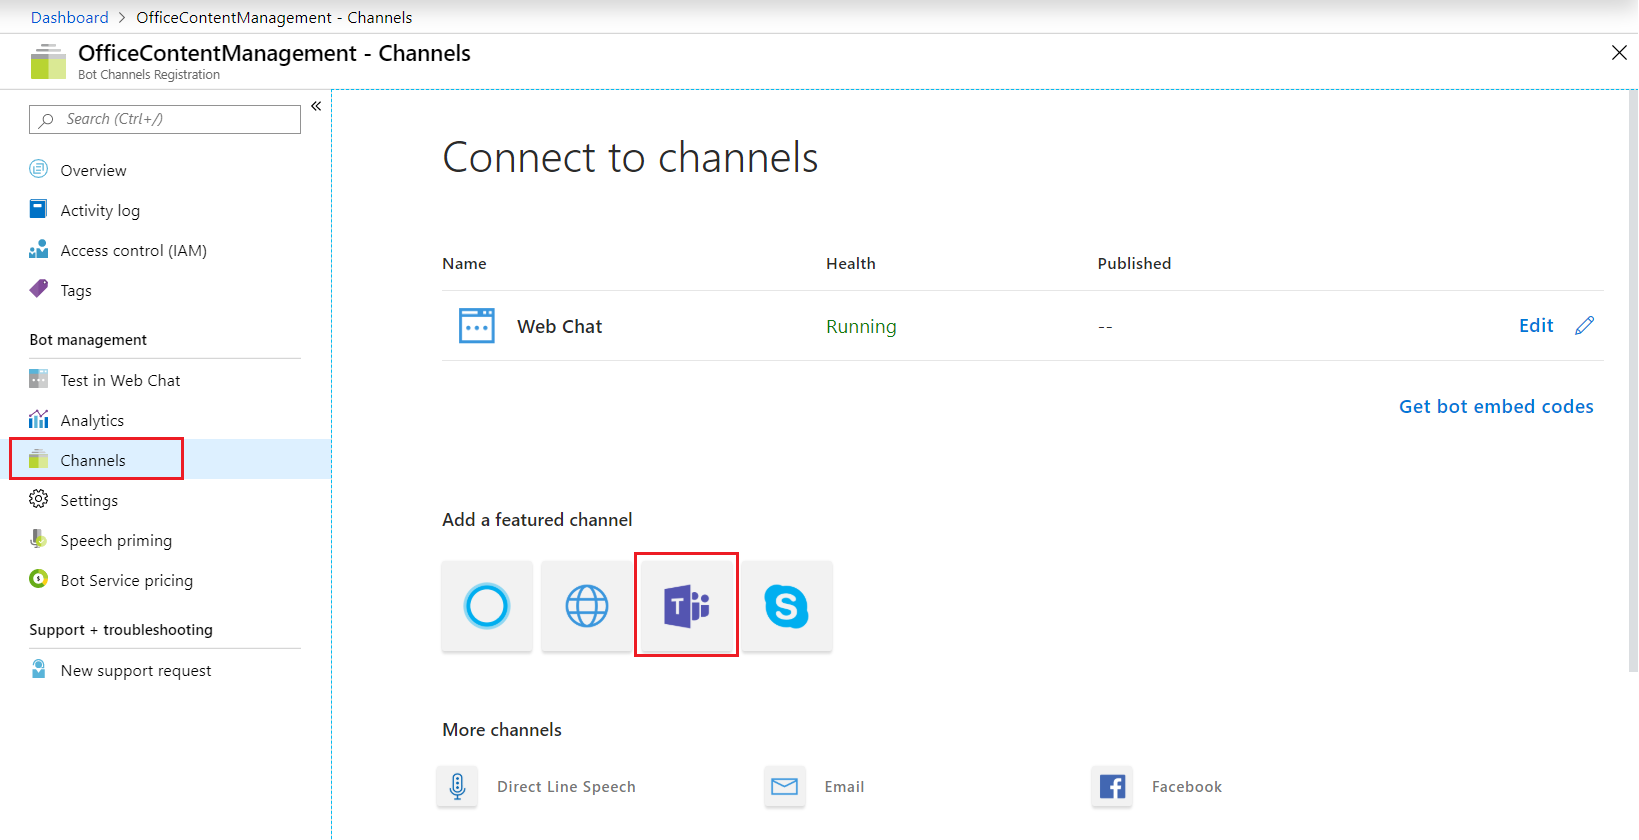
-
Click MS Teams icon under featured channel.
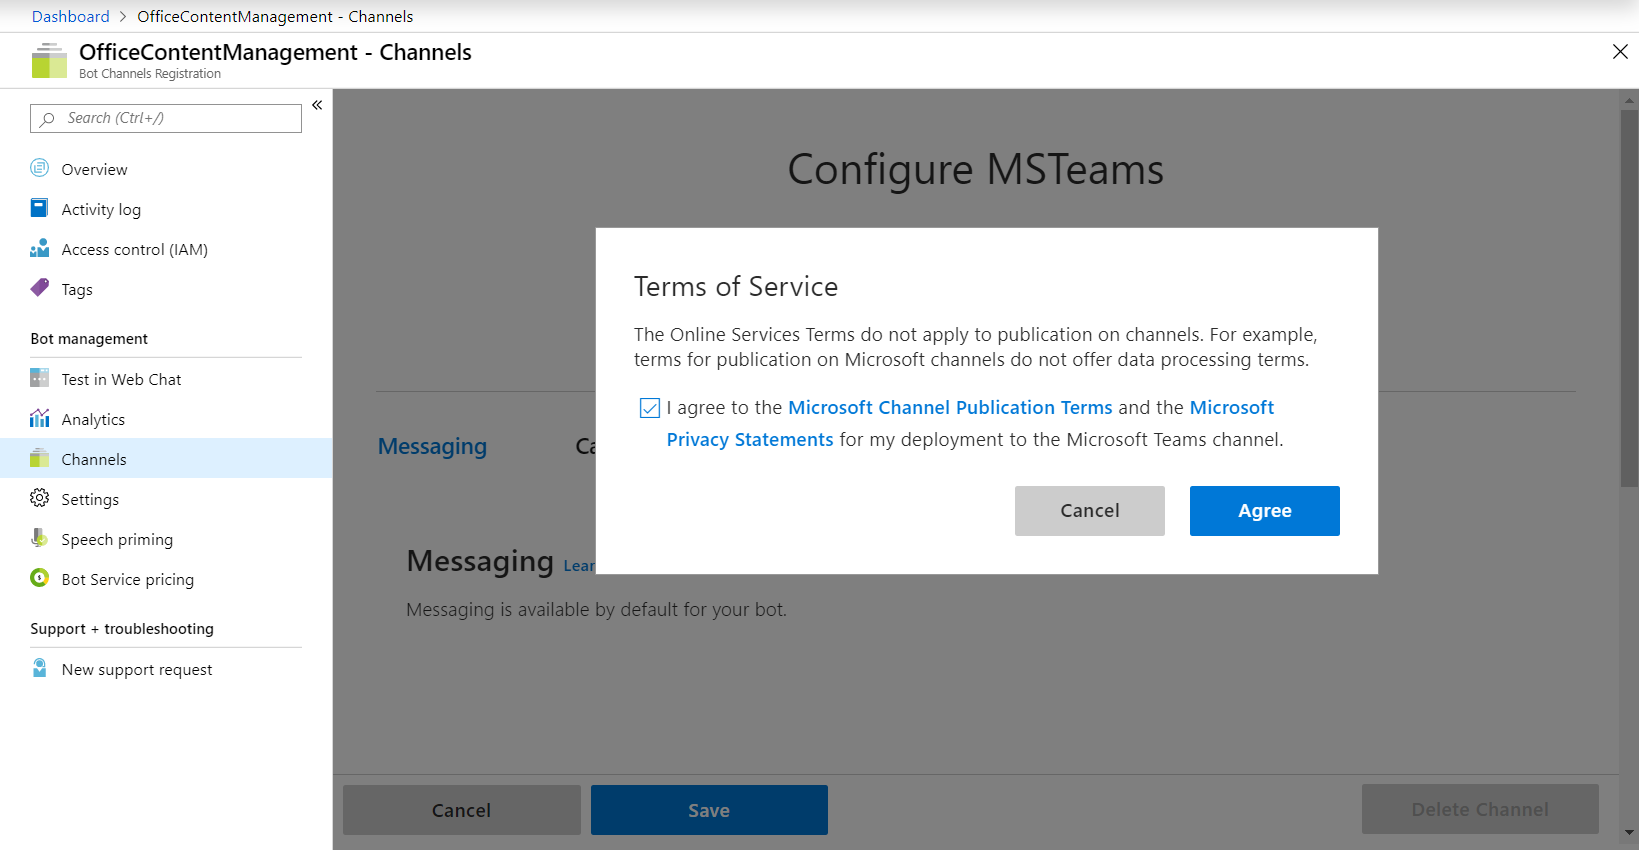
- Click Save.
- Agree to the Terms of Service.
Get the Bot Channel Registration Id and secret
- Under Bot Management section, click Settings.
-
Note down Microsoft App ID.
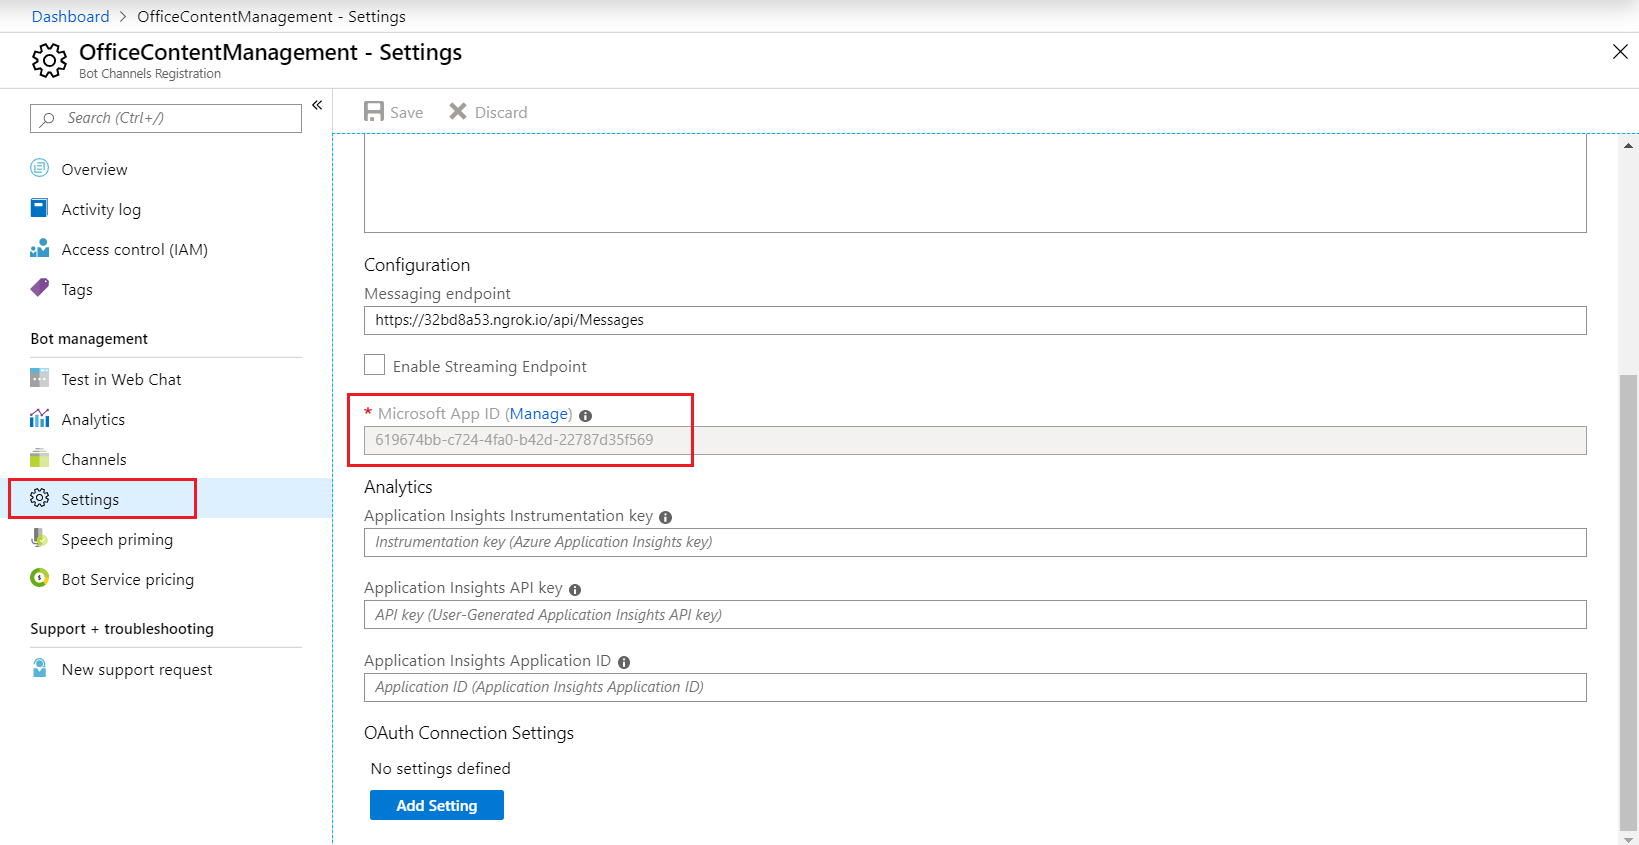
- Click Manage link, next to Microsoft App ID.
-
Under Client secrets, click New client secret.

- The dialog window will appear. Add description and expiration.
-
Click Add.
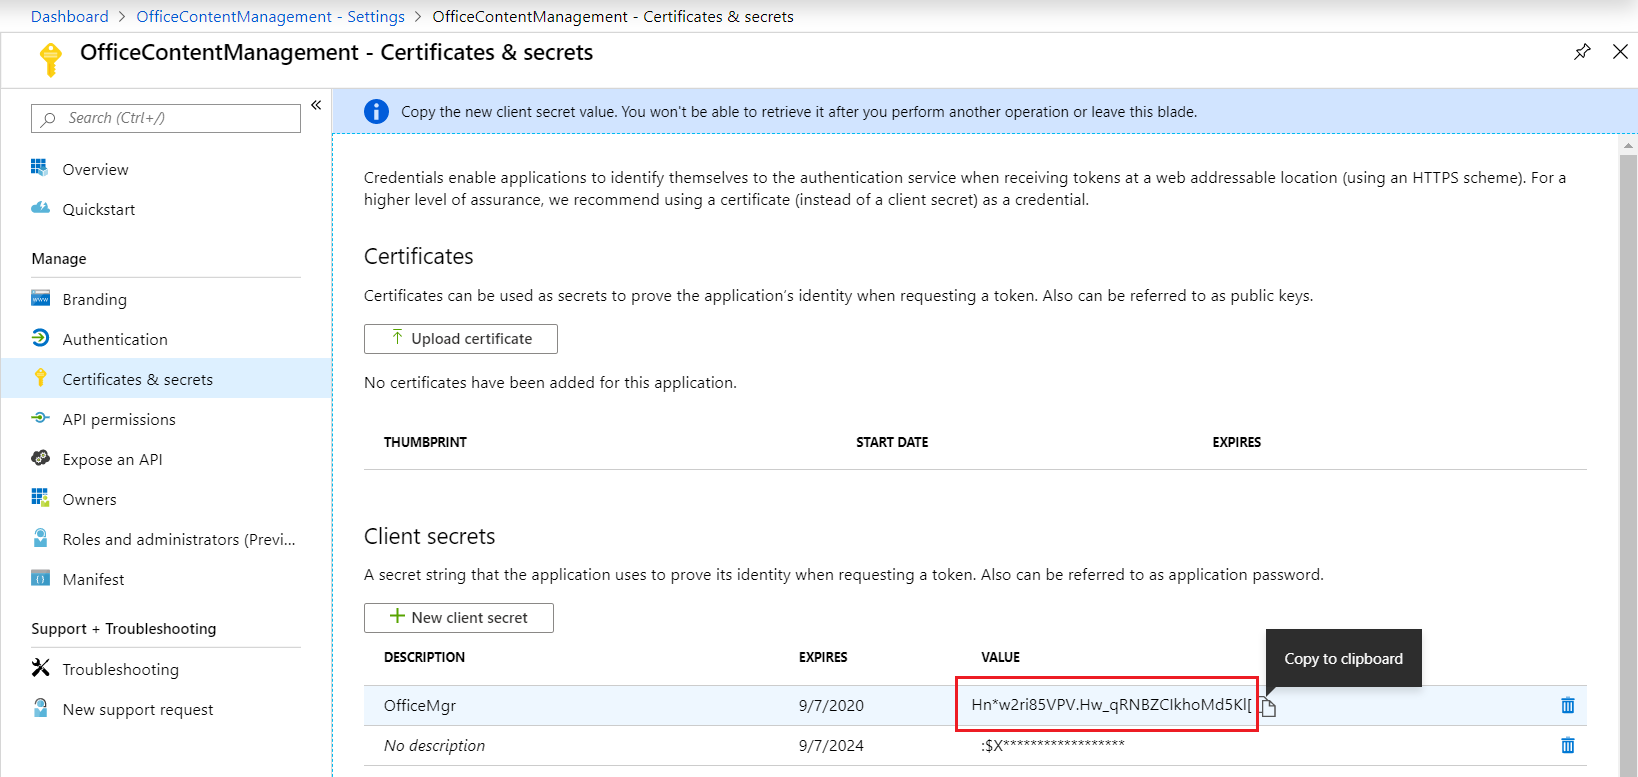
- Copy the secret string.
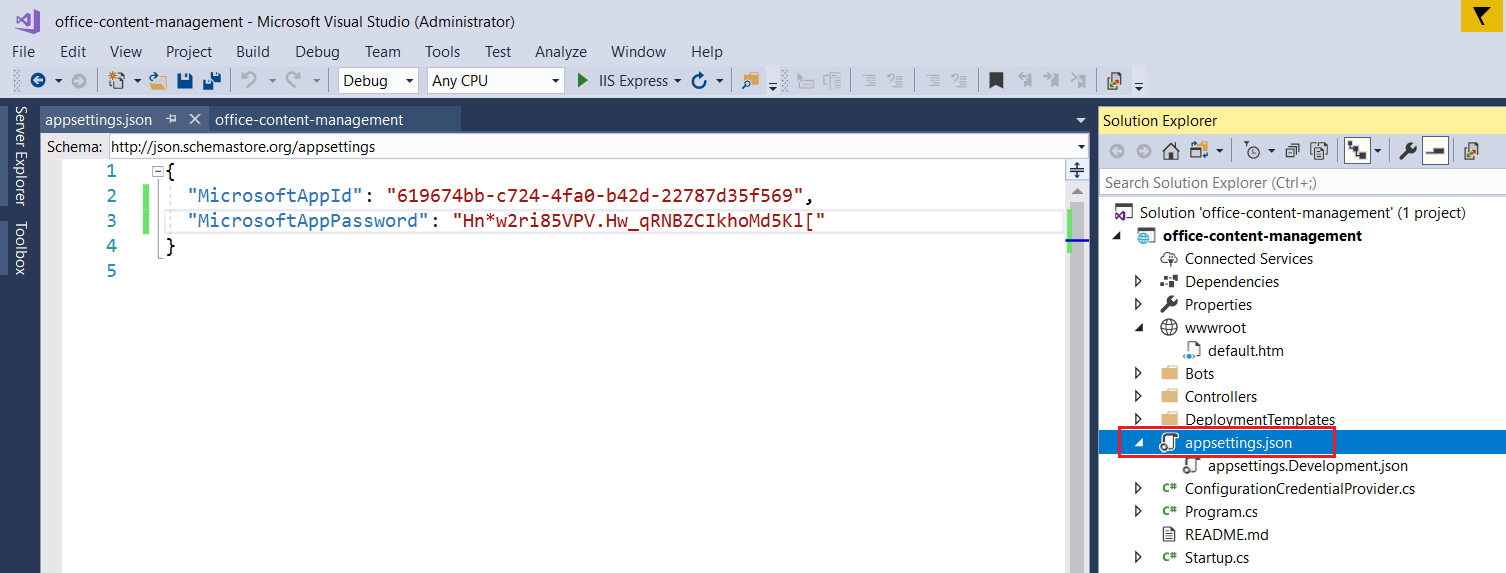
- In the Visual Studio, add MicrosoftAppId and MicrosoftAppPassword under appsettings.json.
Package Bot from Visual Studio
We will add manifest file and related resources that will be compressed as zip file and added to MS Teams.
- In Visual Studio, add folder Manifest.
- Upload icons for color and outline.
- Add file manifest.json with below content.
{
  "$schema": "https://developer.microsoft.com/en-us/json-schemas/teams/v1.3/MicrosoftTeams.schema.json",
  "manifestVersion": "1.3",
  "version": "1.0.0",
  "id": "[microsoft-app-id]",
  "packageName": "io.ngrok.[ngrok-address]",
  "developer": {
    "name": "Office Developer",
    "websiteUrl": "https://[ngrok-address].ngrok.io",
    "privacyUrl": "https://[ngrok-address].ngrok.io/privacy",
    "termsOfUseUrl": "https://[ngrok-address].ngrok.io/termsofuse"
  },
  "icons": {
    "color": "bot-icon-color-192x192.png",
    "outline": "bot-icon-outline-32x32.png"
  },
  "name": {
    "short": "office-content-management-bot ",
    "full": "Office Content Management Bot"
  },
  "description": {
    "short": "Office Content Management",
    "full": "Sample bot for the Office Content Management"
  },
  "accentColor": "#AB00B0",
  "bots": [
    {
      "botId": "[microsoft-app-id]",
      "supportsFiles": true,
      "scopes": [
        "personal",
        "team"
      ]
    }
  ],
  "composeExtensions": [],
  "permissions": [
    "identity",
    "messageTeamMembers"
  ],
  "validDomains": []
}
- Replace token
[microsoft-app-id]with MicrosoftAppId. - Replace token
[ngrok-address]with forwarding address from ngrok window. (e.g. https://4541d6ad.ngrok.io)
Compress Manifest folder
- In the Solution explorer, right click on the project and choose to unload.
- Again, right click on project and choose to edit.
- Since AfterBuild and AfterPublish targets are defined in the import
it is expanded to include Sdk.props file before your project's content and Sdk.targets after them, the targets defined in the project will be overwritten by the targets defined by the Sdk / "common targets". -
Update the file content as below.
<Project> <Import Project="Sdk.props" Sdk="Microsoft.NET.Sdk.Web" /> <PropertyGroup> <TargetFramework>netcoreapp2.1</TargetFramework> </PropertyGroup> <ItemGroup> <PackageReference Include="Microsoft.AspNetCore.App" /> <PackageReference Include="Microsoft.Bot.Builder.Integration.AspNet.Core" Version="4.4.3" /> </ItemGroup> <ItemGroup> <Content Update="appsettings.json"> <CopyToOutputDirectory>Always</CopyToOutputDirectory> </Content> </ItemGroup> </Project> -
Add below target at the end of file.
<Import Project="Sdk.targets" Sdk="Microsoft.NET.Sdk.Web" /> <Target Name="AfterBuild"> <ZipDir InputBaseDirectory="manifest" OutputFileName="$(OutputPath)\$(MSBuildProjectName).zip" OverwriteExistingFile="true" IncludeBaseDirectory="false" /> </Target> -
Add below task element at the end of file.
<UsingTask TaskName="ZipDir" TaskFactory="CodeTaskFactory" AssemblyFile="$(MSBuildToolsPath)\Microsoft.Build.Tasks.v4.0.dll"> <ParameterGroup> <InputBaseDirectory ParameterType="System.String" Required="true" /> <OutputFileName ParameterType="System.String" Required="true" /> <OverwriteExistingFile ParameterType="System.Boolean" Required="false" /> <IncludeBaseDirectory ParameterType="System.Boolean" Required="false" /> </ParameterGroup> <Task> <Reference Include="System.IO.Compression" /> <Reference Include="System.IO.Compression.FileSystem" /> <Using Namespace="System.IO.Compression" /> <Code Type="Fragment" Language="cs"> <![CDATA[ if (File.Exists(OutputFileName)) { if (!OverwriteExistingFile) { return false; } File.Delete(OutputFileName); } ZipFile.CreateFromDirectory ( InputBaseDirectory, OutputFileName, CompressionLevel.Optimal, IncludeBaseDirectory ); ]]> </Code> </Task> </UsingTask> - In the solution explorer, right click and reload the project.
- Build the solution. The AfterBuild target will run and compressed .zip file will be available under bin folder.
- Run the Visual Studio solution by pressing F5 key.
Upload app into Microsoft Teams
- Open MS Teams.
-
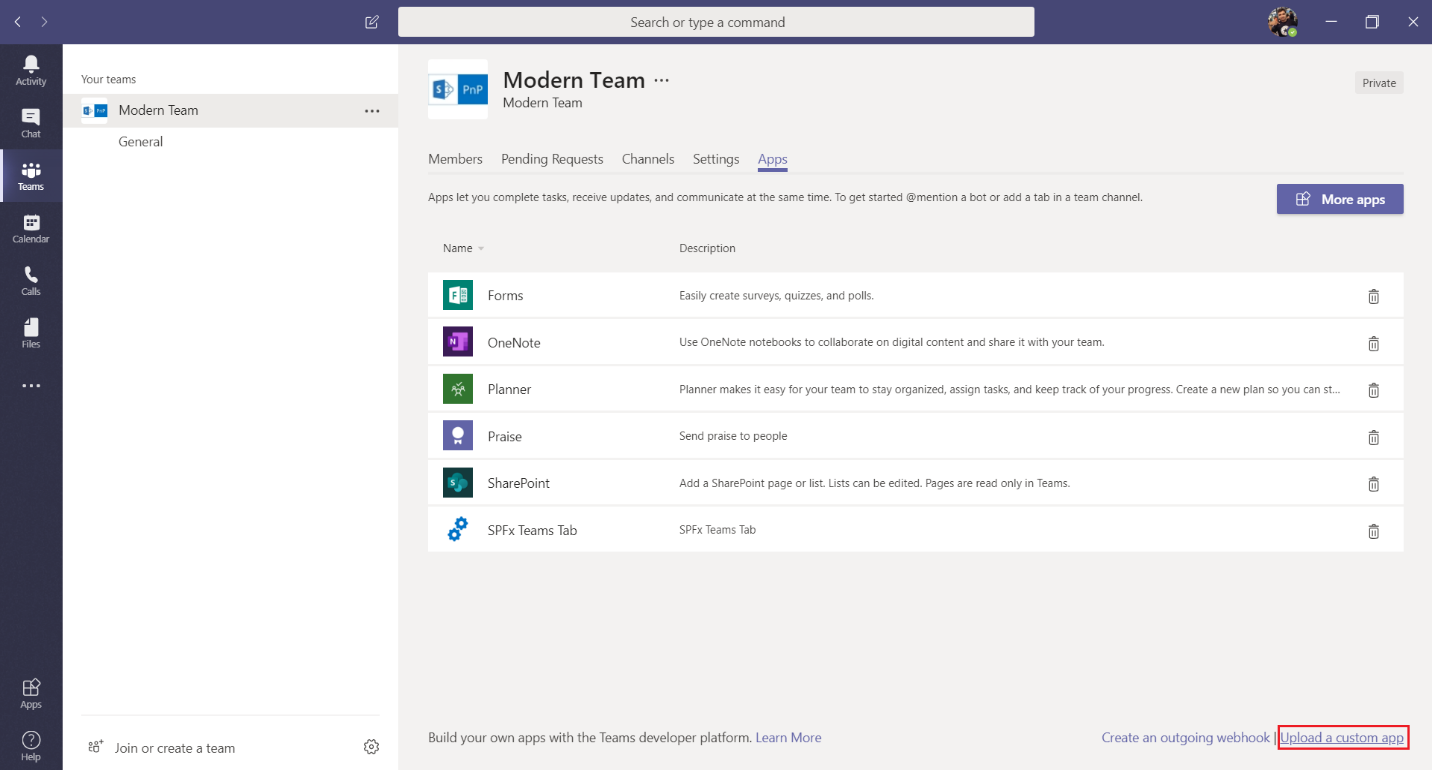
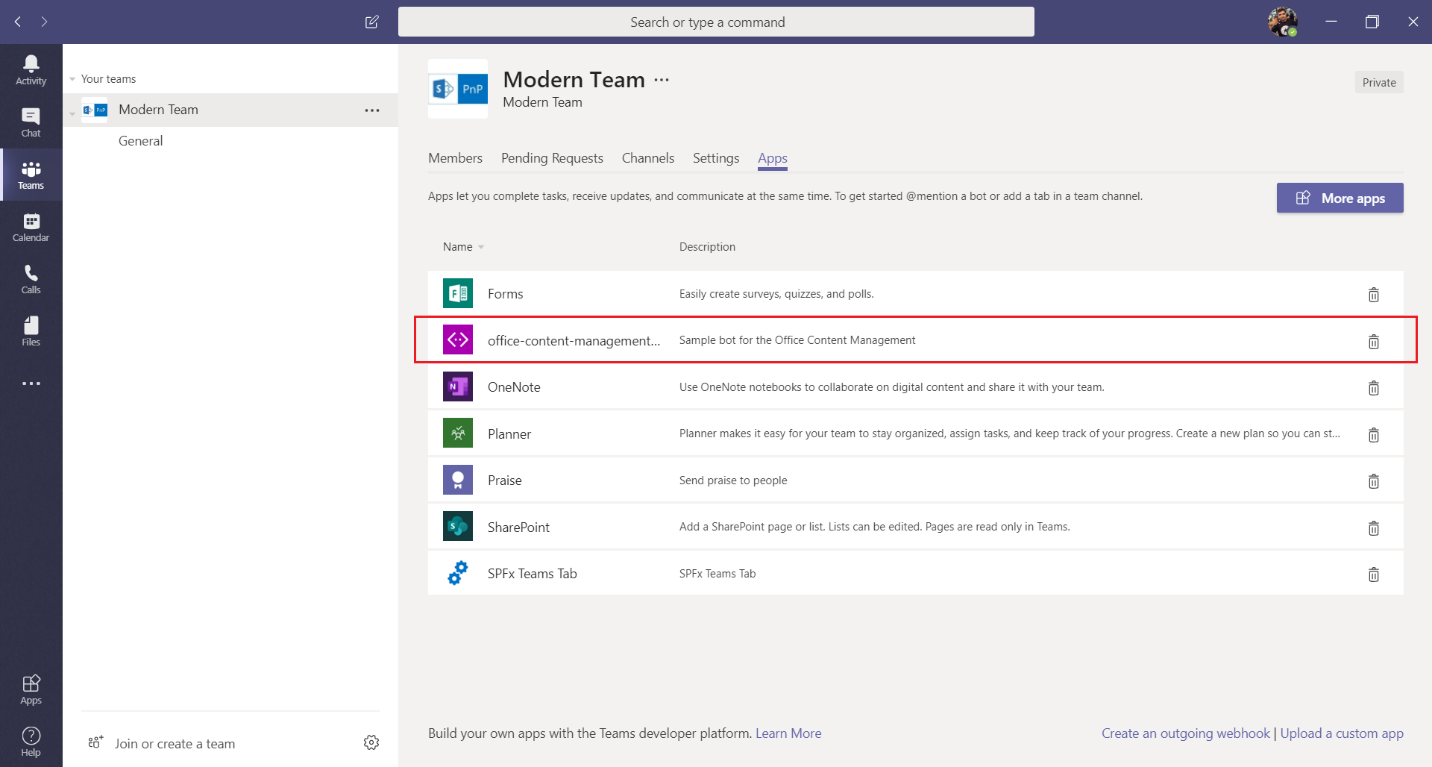
Right click on any existing team, click Manage team.
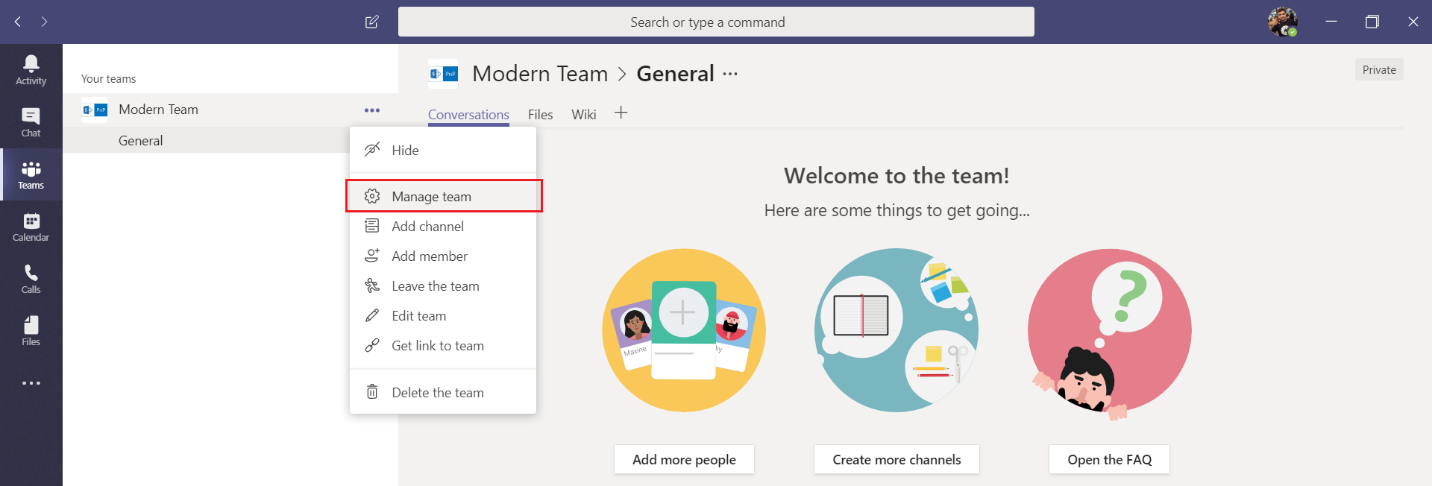
- Click Apps tab.
-
Click Upload a custom app.
- Upload the zip file generated inside bin folder of Visual Studio solution.
- The bot app will be available to use.
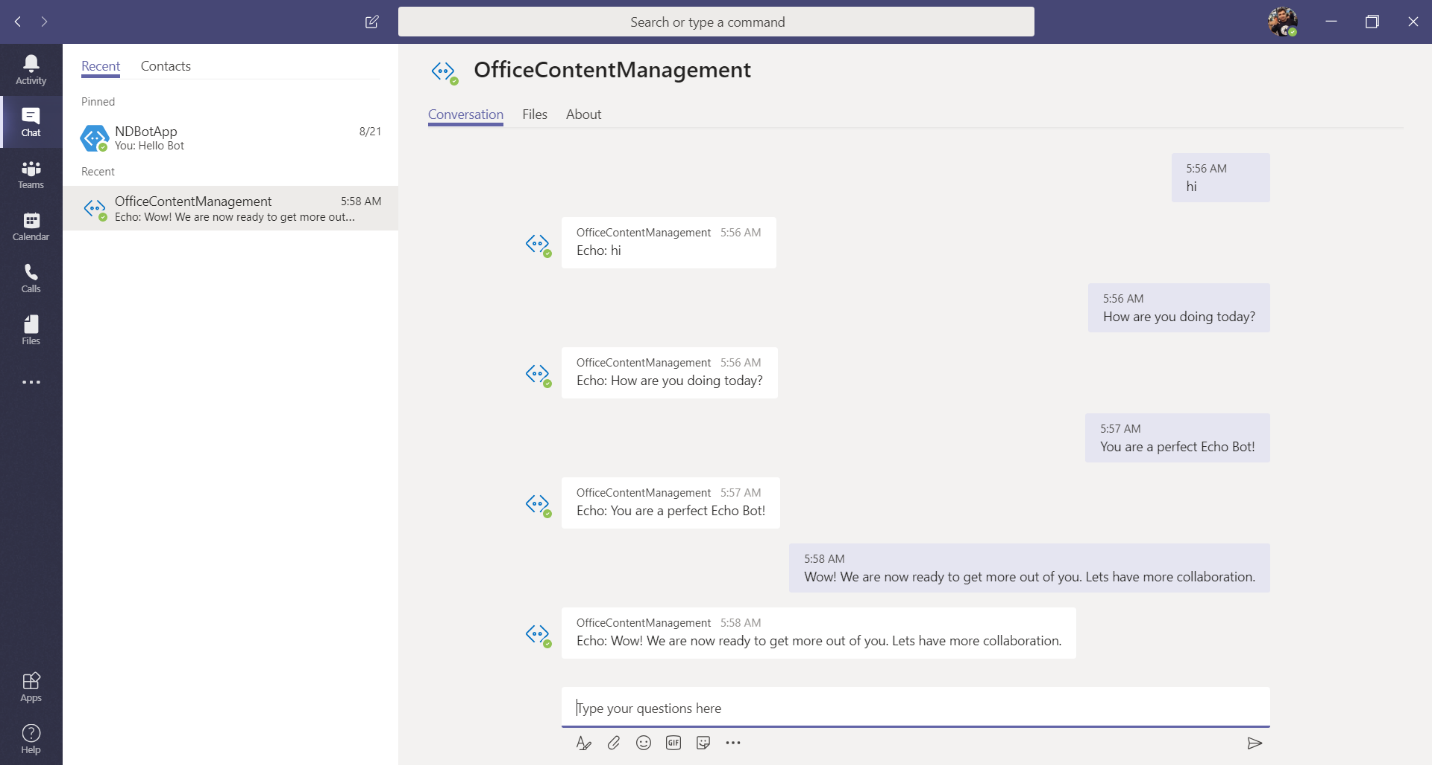
Test the Bot in MS Teams
- Open MS Teams.
- From left menu, click Chat.
- Our Bot (named OfficeContentManagement) should be listed out.
- Send the messages to Bot, it should echo back.
In order to run the bot inside Microsoft Teams:
- The bot must be accessible from the internet.
- The bot must be registered with the bot connector.
- The AppId and AppPassword from the bot framework registration page have to be recorded in the project’s web.config.
- The bot must be added to Microsoft Teams.
Summary
MS Teams supports integration with various apps and services including Bot. Both v3 and v4 bots built on the Bot Framework work well with MS Teams. Visual Studio offers ready templates for Microsoft Bot Framework v4. Ngrok exposes a process running on your localhost to the public internet.
This content was originally posted here.


Leave a comment