
SharePoint Framework - Logging
Overview
SharePoint web parts follows their own life cycle while executing the user requests. Everything looks normal till the time all requests goes well and web part performs the user interactions (without any error). The awkward moment comes when any of the user request fails and web part starts displaying error message.
SharePoint by default supports logging. If the verbose logging is enabled, SharePoint tracks each of the activity and obviously it creates loads of logs. In these situations, going through huge logs and finding related information about our error is cumbersome. It is always advisable to have our own logging mechanism implemented.
SharePoint Framework (SPFx) also has no exception to it and supports logging APIs which can be used during the lifecycle of the web part.
Logging Overview
The logging levels are predefined.
| Logging Level | Definition |
| Verbose | Corresponds to lengthy events. Logs almost everything. |
| Information | Do not require any attention. However they provides valuable data for monitoring state of solution |
| Warning | Indicates potential problem or issue that might needs attention. We should monitor the pattern over the time. If ignored warning may result in sever error. |
| Error | Requires urgent attention. All error events should be investigated. |
| Critical | Indicates serious error that has caused major failure in the solution |
| None | No logging occurs |
Verbose is least important followed by information, warning and error.
Create SPFx Solution
-
Open command prompt. Create a directory for SPFx solution.
md spfx-logging -
Navigate to above created directory.
cd spfx-logging -
Run Yeoman SharePoint Generator to create the solution.
yo @microsoft/sharepoint -
Yeoman generator will present you with the wizard by asking questions about the solution to be created.
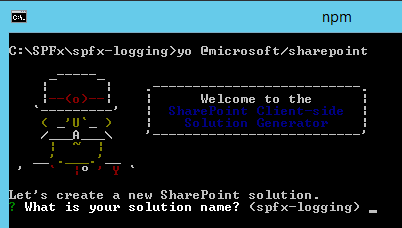
- Solution Name: Hit enter to have default name (spfx-logging in this case) or type in any other name for your solution.
- Selected choice: Hit enter
- Target for component: Here we can select the target environment where we are planning to deploy the client webpart i.e. SharePoint Online or SharePoint OnPremise (SharePoint 2016 onwards).
- Selected choice: SharePoint Online only (latest)
- Place of files: We may choose to use the same folder or create a subfolder for our solution.
- Selected choice: Same folder
- Deployment option: Selecting Y will allow the app to deployed instantly to all sites and will be accessible everywhere.
- Selected choice: N (install on each site explicitly)
- Type of client-side component to create: We can choose to create client side webpart or an extension. Choose webpart option.
- Selected choice: WebPart
- Web part name: Hit enter to select the default name or type in any other name.
- Selected choice: SPFxLogger
- Web part description: Hit enter to select the default description or type in any other value.
- Selected choice: Logging with SPFx
- Framework to use: Select any JavaScript framework to develop the component. Available choices are (No JavaScript Framework, React, and Knockout)
- Selected choice: No JavaScript Framework
- Solution Name: Hit enter to have default name (spfx-logging in this case) or type in any other name for your solution.
- Yeoman generator will perform scaffolding process to generate the solution. The scaffolding process will take significant amount of time.
-
Once the scaffolding process is completed, lock down the version of project dependencies by running below command.
npm shrinkwrap -
On the command prompt type below command to open the solution in code editor of your choice.
code .
Working with Logging API
SharePoint Framework supports logging out of the box. Use below import for logs.
import { Log } from '@microsoft/sp-core-library';
Define our log source.
const LOG_SOURCE: string = 'SPFxLogger';
Log the messages from web part.
@override
public onInit(): Promise<void> {
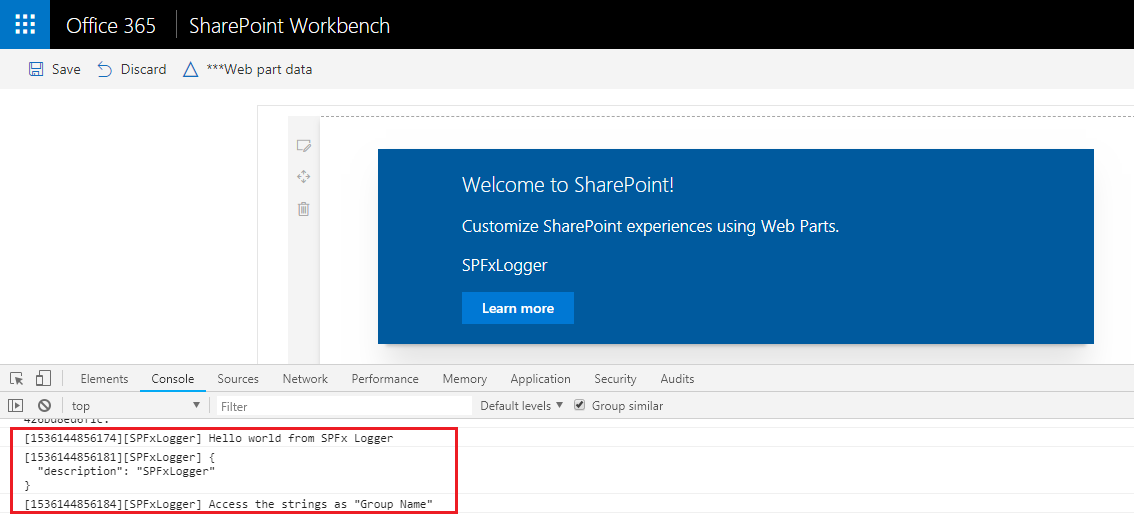
Log.info(LOG_SOURCE, 'Hello world from SPFx Logger');
Log.info(LOG_SOURCE, JSON.stringify(this.properties, undefined, 2));
Log.info(LOG_SOURCE, `Access the strings as "${strings.BasicGroupName}"`);
return Promise.resolve<void>();
}
The Log class offers 4 methods to log the information each of which represents corresponding log level – verbose, info, warn, and error. The first parameter is logging location. By default it is name of the web part. But can be overridden. The next parameter is the message to be logged. Optionally we can specify the service scope.
While debugging the SPFx web part, the log message should appear in the console window of browser.
Summary
SharePoint Framework out of the box provides an API to log information in your solutions. Use the logs effectively to get benefited out of it at the time of investigating the cause of error.
This content was originally posted here.


Leave a comment