
SharePoint Framework - CRUD operations using SP-PNP-JS
Overview
In the article Develop First Client Side Web Part , we developed basic SharePoint client web part which can run independently without any interaction with SharePoint.
In this article, we will explore to interact with the SharePoint list for CRUD (Create, Read, Update, and Delete) operations using external JavaScript library called SP PNP JS. The CRUS operations will be performed using REST APIs.
Brief about SP-PnP-JS
SP PnP JS is pattern and practices core JavaScript library offers simplified common operations with SharePoint to help developers concentrate on business logic without worrying much about the underlying technical implementation. It contains fluent APIs to work with SharePoint REST APIs. Read more about it at - https://www.npmjs.com/package/sp-pnp-js
Create SPFx Solution
-
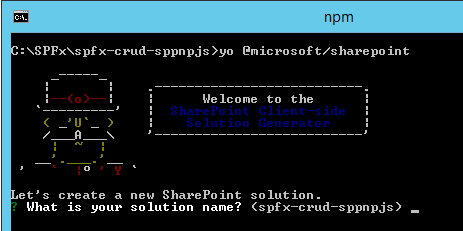
Open command prompt. Create a directory for SPFx solution.
md spfx-crud-sppnpjs -
Navigate to above created directory.
cd spfx-crud-sppnpjs -
Run Yeoman SharePoint Generator to create the solution.
yo @microsoft/sharepoint -
Yeoman generator will present you with the wizard by asking questions about the solution to be created.
- Solution Name: Hit enter to have default name (spfx-crud-no-framework in this case) or type in any other name for your solution.
- Selected choice: Hit enter
- Target for component: Here we can select the target environment where we are planning to deploy the client webpart i.e. SharePoint Online or SharePoint OnPremise (SharePoint 2016 onwards).
- Selected choice: SharePoint Online only (latest)
- Place of files: We may choose to use the same folder or create a subfolder for our solution.
- Selected choice: Same folder
- Deployment option: Selecting Y will allow the app to deployed instantly to all sites and will be accessible everywhere.
- Selected choice: N (install on each site explicitly)
- Type of client-side component to create: We can choose to create client side webpart or an extension. Choose webpart option.
- Selected choice: WebPart
- Web part name: Hit enter to select the default name or type in any other name.
- Selected choice: SPPnPJSCRUD
- Web part description: Hit enter to select the default description or type in any other value.
- Selected choice: CRUD operations with SP PnP JS
- Framework to use: Select any JavaScript framework to develop the component. Available choices are (No JavaScript Framework, React, and Knockout)
- Selected choice: No JavaScript Framework
- Solution Name: Hit enter to have default name (spfx-crud-no-framework in this case) or type in any other name for your solution.
- Yeoman generator will perform scaffolding process to generate the solution. The scaffolding process will take significant amount of time.
-
Once the scaffolding process is completed, lock down the version of project dependencies by running below command.
npm shrinkwrap -
On the command prompt type below command to open the solution in code editor of your choice.
code .
Configure sp-pnp-js
On the command prompt, run below command to install sp-pnp-js
npm install sp-pnp-js --save
Configure Property for List Name
SPFx solution by default have description property created. Let us change the property to list name. We will use this property to configure the list name on which the CRUD operation is to perform.
- Open mystrings.d.ts under “\src\webparts\spPnPjscrud\loc" folder.
-
Rename DescriptionFieldLabel to ListNameFieldLabel.
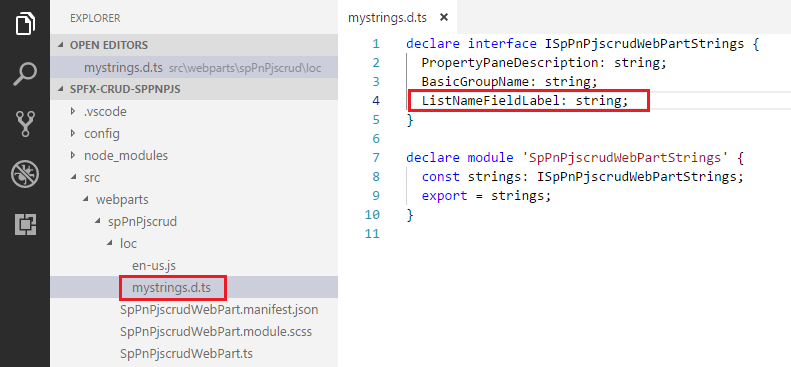
declare interface ISpPnPjscrudWebPartStrings { PropertyPaneDescription: string; BasicGroupName: string; DescriptionFieldLabel: string; } declare module 'SpPnPjscrudWebPartStrings' { const strings: ISpPnPjscrudWebPartStrings; export = strings; } -
In en-us.js file under “\src\webparts\spPnPjscrud\loc" folder set the display name for listName property.
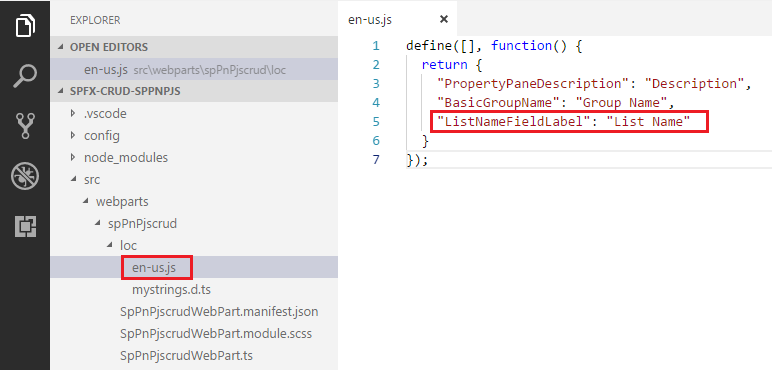
define([], function() { return { "PropertyPaneDescription": "Description", "BasicGroupName": "Group Name", "DescriptionFieldLabel": "Description Field" } }); - Open main webpart file (SpPnPjscrudWebPart.ts) under “\src\webparts\spPnPjscrud” folder.
-
Rename description property pane field to listName.
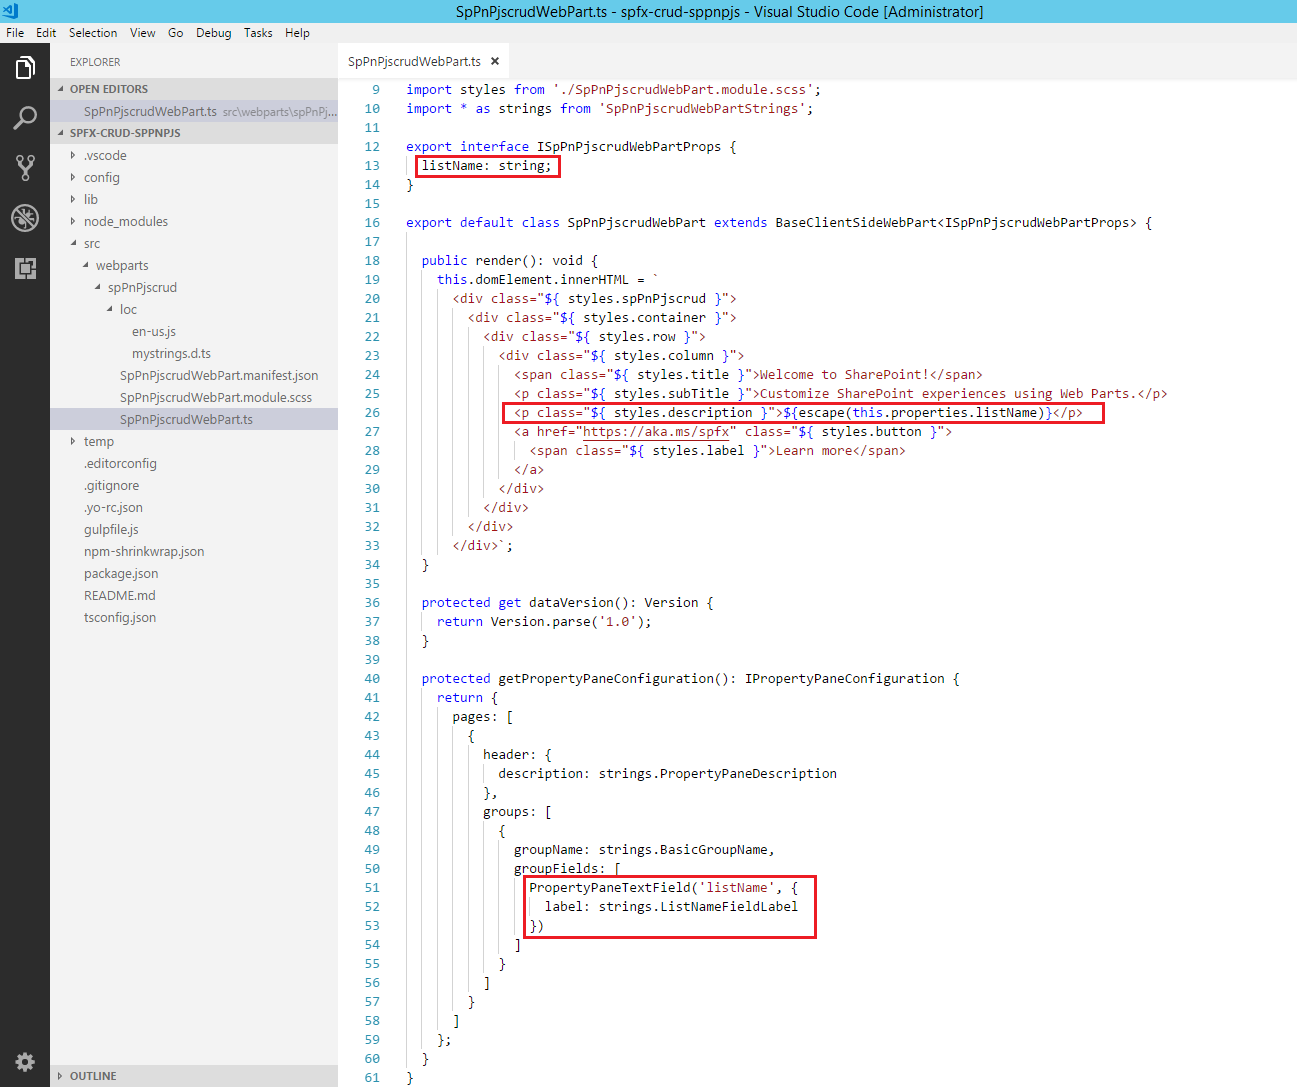
import { Version } from '@microsoft/sp-core-library'; import { BaseClientSideWebPart, IPropertyPaneConfiguration, PropertyPaneTextField } from '@microsoft/sp-webpart-base'; import { escape } from '@microsoft/sp-lodash-subset'; import styles from './SpPnPjscrudWebPart.module.scss'; import * as strings from 'SpPnPjscrudWebPartStrings'; export interface ISpPnPjscrudWebPartProps { description: string; } export default class SpPnPjscrudWebPart extends BaseClientSideWebPart<ISpPnPjscrudWebPartProps> { public render(): void { this.domElement.innerHTML = ` <div class="${ styles.spPnPjscrud }"> <div class="${ styles.container }"> <div class="${ styles.row }"> <div class="${ styles.column }"> <span class="${ styles.title }">Welcome to SharePoint!</span> <p class="${ styles.subTitle }">Customize SharePoint experiences using Web Parts.</p> <p class="${ styles.description }">${escape(this.properties.description)}</p> <a href="https://aka.ms/spfx" class="${ styles.button }"> <span class="${ styles.label }">Learn more</span> </a> </div> </div> </div> </div>`; } protected get dataVersion(): Version { return Version.parse('1.0'); } protected getPropertyPaneConfiguration(): IPropertyPaneConfiguration { return { pages: [ { header: { description: strings.PropertyPaneDescription }, groups: [ { groupName: strings.BasicGroupName, groupFields: [ PropertyPaneTextField('description', { label: strings.DescriptionFieldLabel }) ] } ] } ] }; } } - On the command prompt, type
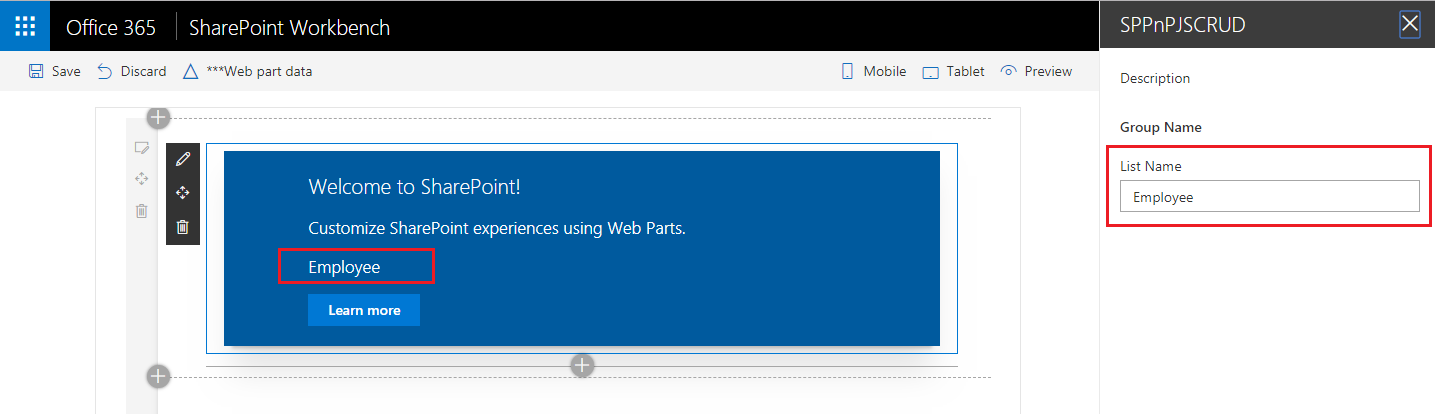
gulp serve. - In the SharePoint local workbench page, add the web part.
-
Edit the web part to ensure the listName property pane field is getting reflected.
Model for List Item
Add a class (IListItem.ts) representing the list item.
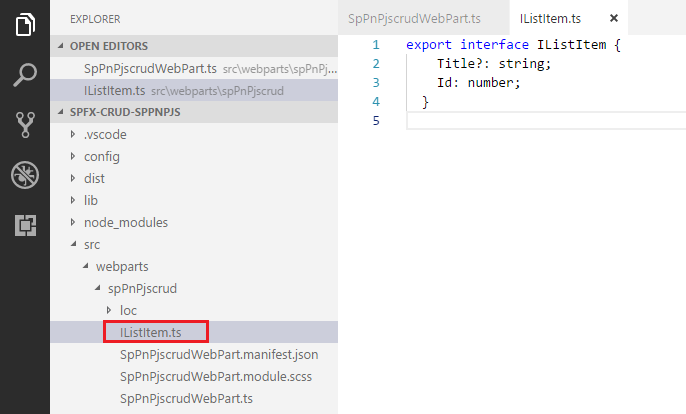
export interface IListItem {
    Title?: string;
    Id: number;
}
Add Controls to WebPart
- Open main webpart file (SpPnPjscrudWebPart.ts) under “\src\webparts\spPnPjscrud” folder.
-
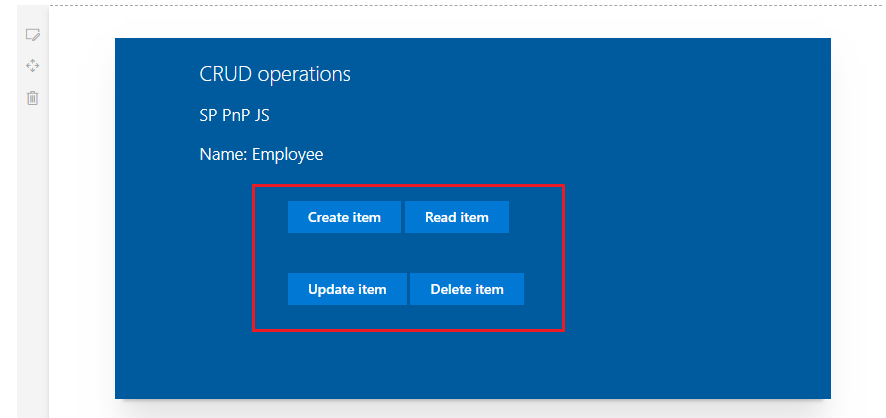
Modify Render method to include buttons for CRUD operations and add event handlers to each of the button.
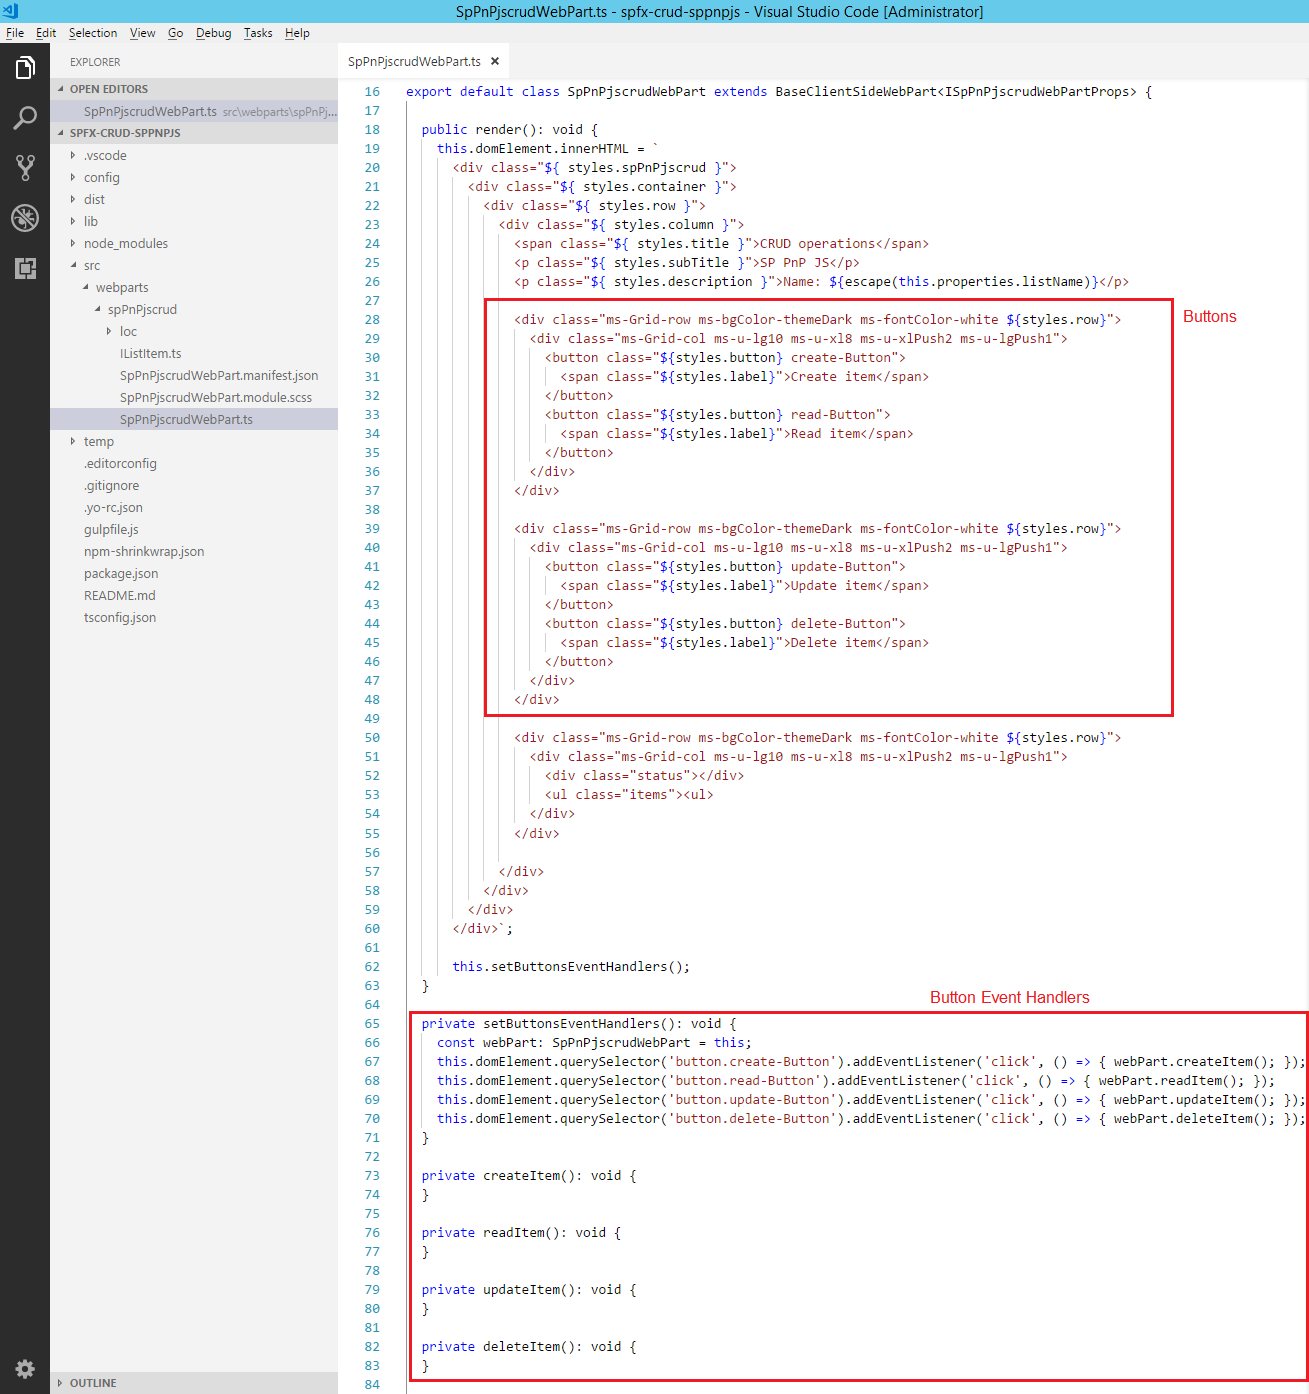
export default class SpPnPjscrudWebPart extends BaseClientSideWebPart<ISpPnPjscrudWebPartProps> { public render(): void { this.domElement.innerHTML = ` <div class="${ styles.spPnPjscrud }"> <div class="${ styles.container }"> <div class="${ styles.row }"> <div class="${ styles.column }"> <span class="${ styles.title }">CRUD operations</span> <p class="${ styles.subTitle }">SP PnP JS</p> <p class="${ styles.description }">Name: ${escape(this.properties.listName)}</p> <div class="ms-Grid-row ms-bgColor-themeDark ms-fontColor-white ${styles.row}"> <div class="ms-Grid-col ms-u-lg10 ms-u-xl8 ms-u-xlPush2 ms-u-lgPush1"> <button class="${styles.button} create-Button"> <span class="${styles.label}">Create item</span> </button> <button class="${styles.button} read-Button"> <span class="${styles.label}">Read item</span> </button> </div> </div> <div class="ms-Grid-row ms-bgColor-themeDark ms-fontColor-white ${styles.row}"> <div class="ms-Grid-col ms-u-lg10 ms-u-xl8 ms-u-xlPush2 ms-u-lgPush1"> <button class="${styles.button} update-Button"> <span class="${styles.label}">Update item</span> </button> <button class="${styles.button} delete-Button"> <span class="${styles.label}">Delete item</span> </button> </div> </div> <div class="ms-Grid-row ms-bgColor-themeDark ms-fontColor-white ${styles.row}"> <div class="ms-Grid-col ms-u-lg10 ms-u-xl8 ms-u-xlPush2 ms-u-lgPush1"> <div class="status"></div> <ul class="items"><ul> </div> </div> </div> </div> </div> </div>`; this.setButtonsEventHandlers(); } private setButtonsEventHandlers(): void { const webPart: SpPnPjscrudWebPart = this; this.domElement.querySelector('button.create-Button').addEventListener('click', () => { webPart.createItem(); }); this.domElement.querySelector('button.read-Button').addEventListener('click', () => { webPart.readItem(); }); this.domElement.querySelector('button.update-Button').addEventListener('click', () => { webPart.updateItem(); }); this.domElement.querySelector('button.delete-Button').addEventListener('click', () => { webPart.deleteItem(); }); } private updateItemsHtml(items: IListItem[]): void { } private readItem(): void { } private updateItem(): void { } private deleteItem(): void { } protected get dataVersion(): Version { return Version.parse('1.0'); } protected getPropertyPaneConfiguration(): IPropertyPaneConfiguration { return { pages: [ { header: { description: strings.PropertyPaneDescription }, groups: [ { groupName: strings.BasicGroupName, groupFields: [ PropertyPaneTextField('listName', { label: strings.ListNameFieldLabel }) ] } ] } ] }; } } -
On the command prompt type
gulp serveto see the buttons on webpart. -
We will use the sp-pnp-js APIs to perform CRUD operations. Let us implement generic method which will return the id of latest item from given list using sp-pnp-js APIs.
 private getLatestItemId(): Promise<number> {
   return new Promise<number>((resolve: (itemId: number) => void, reject: (error: any) => void): void => {
     sp.web.lists.getByTitle(this.properties.listName)
       .items.orderBy('Id', false).top(1).select('Id').get()
       .then((items: { Id: number }[]): void => {
         if (items.length === 0) {
           resolve(-1);
         }
         else {
           resolve(items[0].Id);
         }
       }, (error: any): void => {
         reject(error);
       });
   });
 }
Import sp-pnp-js
Add below import statements to main web part.
import { IListItem } from './IListItem';
import pnp, { sp, Item, ItemAddResult, ItemUpdateResult } from "sp-pnp-js";
Implement Create Operation
We will use the sp-pnp-js API of items.add to add the item to list
private createItem(): void {
this.updateStatus('Creating item...');
sp.web.lists.getByTitle(this.properties.listName).items.add({
'Title': `Item ${new Date()}`
}).then((result: ItemAddResult): void => {
const item: IListItem = result.data as IListItem;
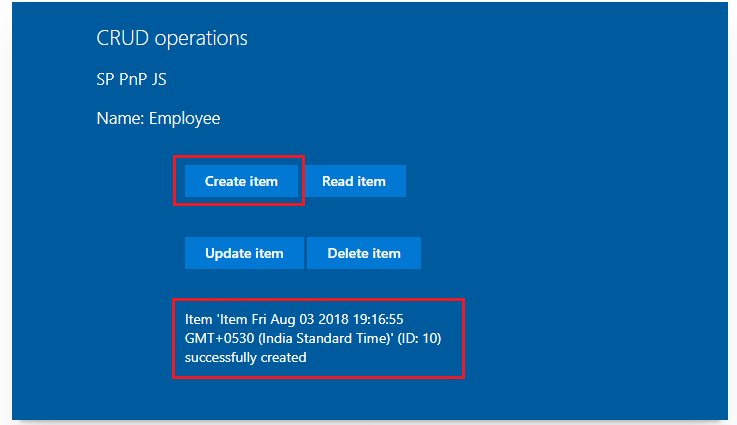
this.updateStatus(`Item '${item.Title}' (ID: ${item.Id}) successfully created`);
}, (error: any): void => {
this.updateStatus('Error while creating the item: ' + error);
});
}
Implement Read Operation
We will use sp-pnp-js API - getById to read the item.
private readItem(): void {
this.updateStatus('Reading latest items...');
this.getLatestItemId()
.then((itemId: number): Promise<IListItem> => {
if (itemId === -1) {
throw new Error('No items found in the list');
}
this.updateStatus(`Loading information about item ID: ${itemId}...`);
return sp.web.lists.getByTitle(this.properties.listName)
.items.getById(itemId).select('Title', 'Id').get();
})
.then((item: IListItem): void => {
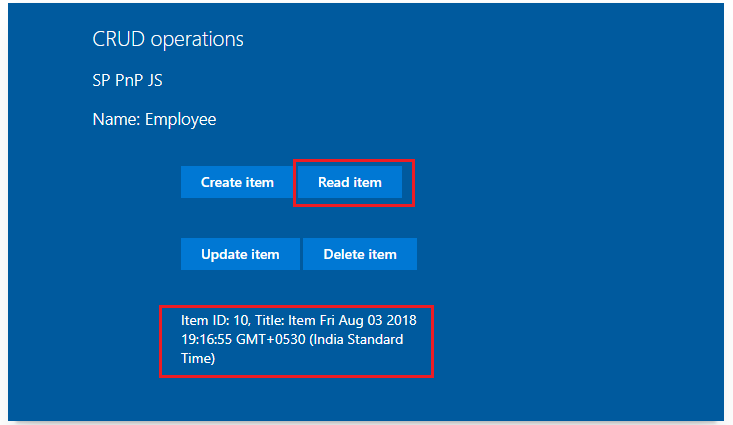
this.updateStatus(`Item ID: ${item.Id}, Title: ${item.Title}`);
}, (error: any): void => {
this.updateStatus('Loading latest item failed with error: ' + error);
});
}
Implement Update Operation
We will use sp-pnp-js API - update
private updateItem(): void {
this.updateStatus('Loading latest items...');
let latestItemId: number = undefined;
let etag: string = undefined;
this.getLatestItemId()
.then((itemId: number): Promise<Item> => {
if (itemId === -1) {
throw new Error('No items found in the list');
}
latestItemId = itemId;
this.updateStatus(`Loading information about item ID: ${itemId}...`);
return sp.web.lists.getByTitle(this.properties.listName)
.items.getById(itemId).get(undefined, {
headers: {
'Accept': 'application/json;odata=minimalmetadata'
}
});
})
.then((item: Item): Promise<IListItem> => {
etag = item["odata.etag"];
return Promise.resolve((item as any) as IListItem);
})
.then((item: IListItem): Promise<ItemUpdateResult> => {
return sp.web.lists.getByTitle(this.properties.listName)
.items.getById(item.Id).update({
'Title': `Updated Item ${new Date()}`
}, etag);
})
.then((result: ItemUpdateResult): void => {
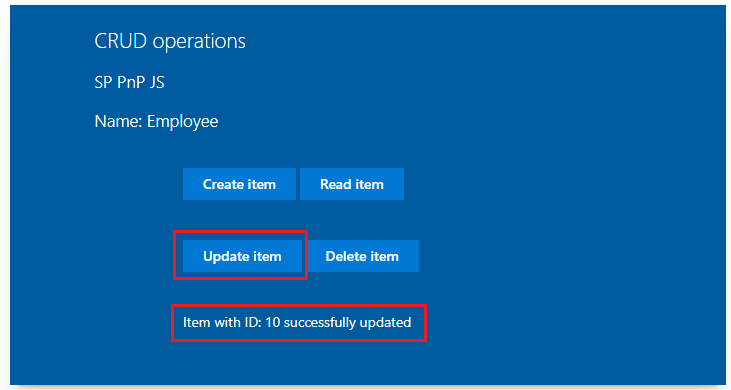
this.updateStatus(`Item with ID: ${latestItemId} successfully updated`);
}, (error: any): void => {
this.updateStatus('Loading latest item failed with error: ' + error);
});
}
Implement Delete Operation
We will use sp-pnp-js API - delete
private deleteItem(): void {
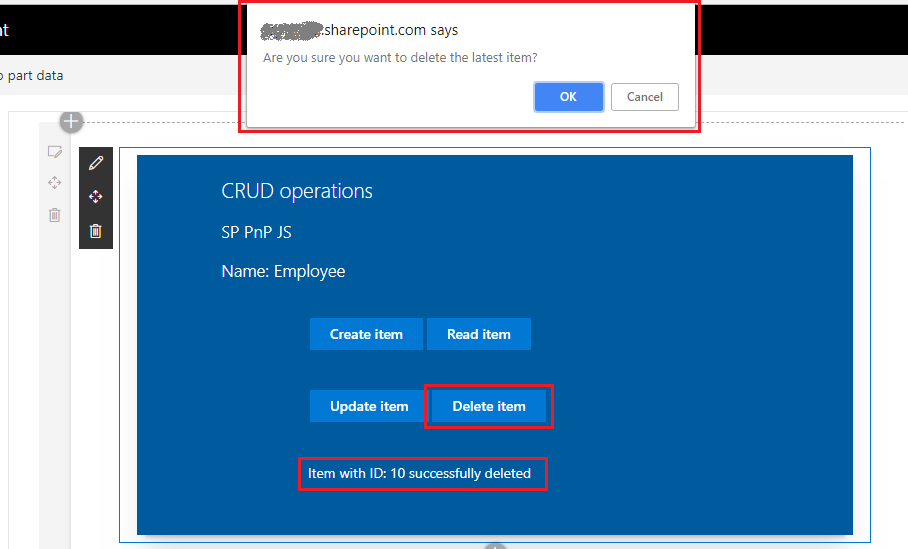
if (!window.confirm('Are you sure you want to delete the latest item?')) {
return;
}
this.updateStatus('Loading latest items...');
let latestItemId: number = undefined;
let etag: string = undefined;
this.getLatestItemId()
.then((itemId: number): Promise<Item> => {
if (itemId === -1) {
throw new Error('No items found in the list');
}
latestItemId = itemId;
this.updateStatus(`Loading information about item ID: ${latestItemId}...`);
return sp.web.lists.getByTitle(this.properties.listName)
.items.getById(latestItemId).select('Id').get(undefined, {
headers: {
'Accept': 'application/json;odata=minimalmetadata'
}
});
})
.then((item: Item): Promise<IListItem> => {
etag = item["odata.etag"];
return Promise.resolve((item as any) as IListItem);
})
.then((item: IListItem): Promise<void> => {
this.updateStatus(`Deleting item with ID: ${latestItemId}...`);
return sp.web.lists.getByTitle(this.properties.listName)
.items.getById(item.Id).delete(etag);
})
.then((): void => {
this.updateStatus(`Item with ID: ${latestItemId} successfully deleted`);
}, (error: any): void => {
this.updateStatus(`Error deleting item: ${error}`);
});
}
Test the web part
- On the command prompt, type
gulp serve. - Open SharePoint site.
- Navigate to /_layouts/15/workbench.aspx
- Add the webpart to page.
- Edit webpart, in the properties pane type the list name.
- Click the buttons (Create Item, Read Item, Update Item, and Delete Item) one by one to test the web part.
- Verify the operations are taking place in SharePoint list.
Create Operation
Read Operation
Update Operation
Delete Operation
Troubleshooting
In some cases SharePoint workbench (https://[tenant].sharepoint.com/_layouts/15/workbench.aspx) shows below error although gulp serve is running.

Open below url in the next tab of browser. Accept the warning message.
https://localhost:4321/temp/manifests.js
Summary
sp-pnp-js APIs helps to perform common operations (like CRUD) with SharePoint easily. It makes the code lesser to maintain. Developer can concentrate on business logic rather than worrying about the identifying and using various REST APIs to use in the code.
This content was originally posted here.


Leave a comment