
SharePoint Framework - Transition to @pnp/sp from sp-pnp-js
Overview
SharePoint Patterns and Practices (PnP) had introduced the sp-pnp-js to simplify common operations with SharePoint and SPFx. The sp-pnp-js had provided various wrapper APIs to perform operations with SharePoint in efficient way and less code. The sp-pnp-js had taken away the complicated work to form REST requests, process the JSON responses and let developers concentrate the actual business logic.
In this article, we will explore the reasons behind deprecation of sp-pnp-js, what is there in @pnp/sp, and how we can transition our code from sp-pnp-js to @pnp/sp.
Why sp-pnp-js is deprecated?
The sp-pnp-js was a huge package of single JS handling multiple responsibilities (e.g. perform SharePoint operations, logging, perform operations with MS graph, taxonomy, etc.). As a result, it was very bulky package.
The single sp-pnp-js package was broken in to multiple packages that gives developers more control and bring in only required pieces to their solutions. This also gives flexibility to update the required package individually.
WebPart with sp-pnp-js
Follow below steps, if you have not have prior project with sp-pnp-js
-
Open command prompt. Create a directory for SPFx solution.
md spfx-sp-pnp -
Navigate to above created directory.
cd spfx-sp-pnp -
Run Yeoman SharePoint Generator to create the solution.
yo @microsoft/sharepoint -
Yeoman generator will present you with the wizard by asking questions about the solution to be created.
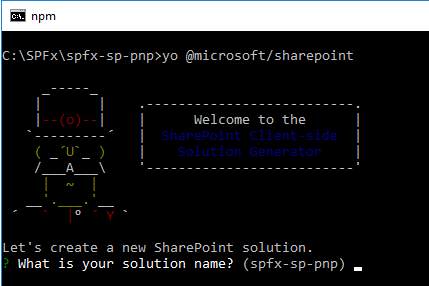
- Solution Name: Hit enter to have default name (spfx-sp-pnp in this case) or type in any other name for your solution.
- Selected choice: Hit enter
- Target for component: Here we can select the target environment where we are planning to deploy the client webpart i.e. SharePoint Online or SharePoint OnPremise (SharePoint 2016 or 2019 onwards).
- Selected choice: SharePoint Online only (latest)
- Place of files: We may choose to use the same folder or create a subfolder for our solution.
- Selected choice: Use the current folder
- Deployment option: Selecting Y will allow the app to deployed instantly to all sites and will be accessible everywhere.
- Selected choice: Y
- Permissions to access web APIs: Choose if the components in the solution require permissions to access web APIs that are unique and not shared with other components in the tenant.
- Selected choice: N (solution contains unique permissions)
- Type of client-side component to create: We can choose to create client side webpart or an extension.
- Selected choice: WebPart
- Web Part Name: Hit enter to select the default name or type in any other name.
- Selected choice: HelloPnP
- Web part description: Hit enter to select the default description or type in any other value.
- Selected choice: Hit enter
- Framework to use: Select any JavaScript framework to develop the component. Available choices are (No JavaScript Framework, React, and Knockout)
- Selected choice: No JavaScript Framework
- Solution Name: Hit enter to have default name (spfx-sp-pnp in this case) or type in any other name for your solution.
-
Open the command prompt, type below command to add sp-pnp-js npm package to project.
npm install sp-pnp-js --save
Code the WebPart
-
On the command prompt type below command to open the solution in code editor of your choice.
code . - Open the webpart file at “\src\webparts\helloPnP\HelloPnPWebPart.ts”.
-
Add
sp-pnp-jsimports.import pnp, { Web } from 'sp-pnp-js'; -
Write onInit() method to configure spfx context.
public onInit(): Promise<void> { // setup to use spfx context return super.onInit().then(_ => { pnp.setup({ spfxContext: this.context }); }); } -
Implement render method.
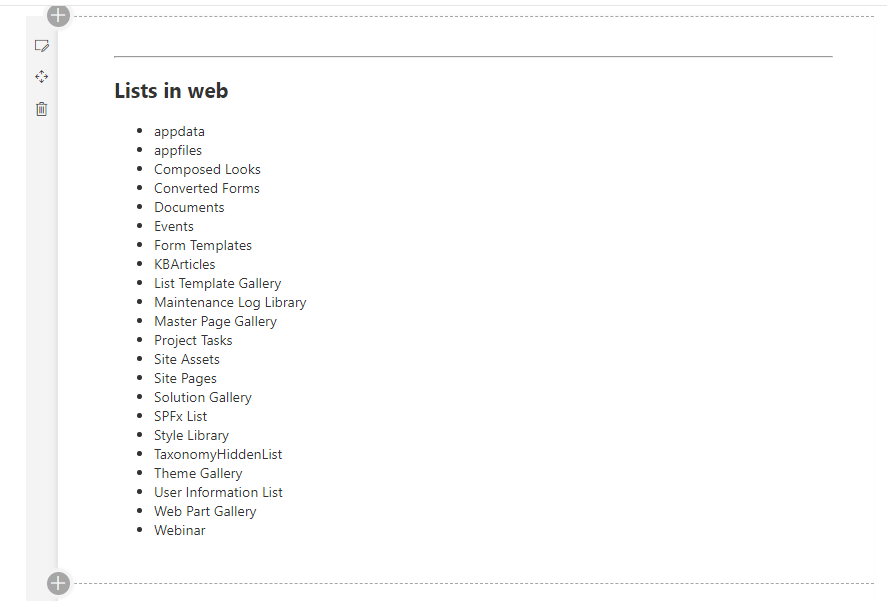
 public render(): void {
   pnp.sp.web.lists.select("Title").getAs<{ Title: string }[]>().then(lists => {
     this.domElement.innerHTML += `<hr/><h2>Lists in web</h2><ul>${lists.map(l => `<li>${l.Title}</li>`).join("")}</ul>`;
   });
 }
Test the WebPart
- On the command prompt, type
gulp serve. - Open SharePoint site
- Navigate to /_layouts/15/workbench.aspx
- Locate and add the webpart to page.
Transition to @pnp/sp from sp-pnp-js
-
On the command prompt, type below command to add sp-pnp-js npm package to project.
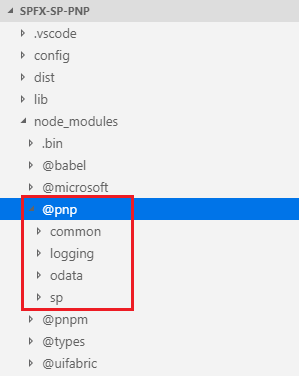
npm i @pnp/logging @pnp/common @pnp/odata @pnp/sp --saveThe new @pnp/sp package will appear under node_modules.
-
We will now update our imports to @pnp/sp.
// sp-pnp-js imports // import pnp, { Web } from 'sp-pnp-js'; // @pnp/sp imports import { sp, Web } from '@pnp/sp'; - Update the code to make use of new @pnp/sp imports. The “pnp” references are replaced with “sp”.
-
Update onInit() method.
public onInit(): Promise<void> { return super.onInit().then(_ => { sp.setup({ spfxContext: this.context }); }); } -
Update render() method.
 public render(): void {
     sp.web.lists.select("Title").get<{ Title: string }[]>().then(lists => {
       this.domElement.innerHTML += `<hr/><h2>Lists in web</h2><ul>${lists.map(l => `<li>${l.Title}</li>`).join("")}</ul>`;
     });
   }
Test after @pnp/sp transition
From the command prompt, type gulp serve to test the webpart after @pnp/sp transition. On the UI front it looks the same as it as before (with sp-pnp-js implementation), however we have upgraded solution behind the scene to newer package.
Summary
sp-pnp-js was introduced to simplify common operations with SharePoint and SPFx. However it was one big bulky file with all functionalities together. SharePoint Patterns and Practices (PnP) have broken it in to multiple packages that gives developers more control and brought in only required pieces to their solutions. As the old sp-pnp-js package is deprecated, to align with future updates it is advisable to start using new @pnp/sp package and start transitioning old solutions to new @pnp/sp package.
This content was originally posted here.

Leave a comment