
SharePoint Framework - React Partial State Update
Overview
SharePoint framework supports React JS natively. React works well with SharePoint framework and it only updates virtual DOM what has been changed instead of re-rendering the entire DOM (Document Object Model). ReactComponent is one of the primary building block of react which has state. Once the state is changed React auto renders what has changed. We can have fairly large data in state.
In this article, we will explore how we can partially update the state in SPFx webpart. We will use React JS in this example. For this article, I am using SharePoint Framework version 1.7.1
React State
State is mutable data that represents internal state of component. When the state is updated, component and its children are re-rendered. It is ideal to initialize a state in constructor. Any events happening on the SharePoint Framework web part can change the component state. We can use setState method of ReactComponent to change its state. When the state has huge data, it is challenging to set the data again along with what has been changed. In these circumstances, we should partially update the state
Create SPFx Solution
-
Open command prompt. Create a directory for SPFx solution.
md spfx-react-partial-state-update -
Navigate to above created directory.
cd spfx-react-partial-state-update -
Run Yeoman SharePoint Generator to create the solution.
yo @microsoft/sharepoint -
Yeoman generator will present you with the wizard by asking questions about the solution to be created.
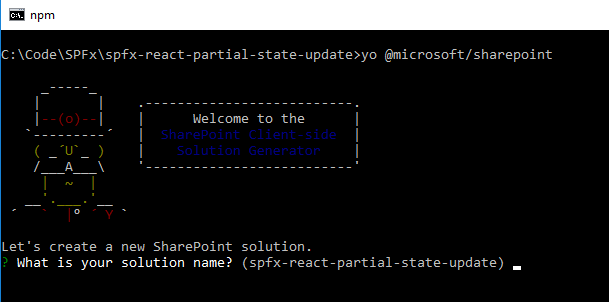
- Solution Name: Hit enter to have default name (spfx-react-partial-state-update in this case) or type in any other name for your solution.
- Selected choice: Hit enter
- Target for component: Here we can select the target environment where we are planning to deploy the client webpart i.e. SharePoint Online or SharePoint OnPremise (SharePoint 2016 onwards).
- Selected choice: SharePoint Online only (latest)
- Place of files: We may choose to use the current folder or create a subfolder for our solution.
- Selected choice: Use the current folder
- Deployment option: We may choose to allow the tenant admin the choice of being able to deploy the solution to all sites immediately without running any feature deployment or adding apps in sites.
- Selected choice: N (install on each site explicitly)
- Type of client-side component to create: We can choose to create client side webpart or an extension. Choose webpart option.
- Selected choice: WebPart
- Web part name: Hit enter to select the default name or type in any other name.
- Selected choice: ReactPartialStateUpdate
- Web part description: Hit enter to select the default description or type in any other value.
- Selected choice: Partially update React State
- Framework to use: Select any JavaScript framework to develop the component. Available choices are (No JavaScript Framework, React, and Knockout)
- Selected choice: React
- Solution Name: Hit enter to have default name (spfx-react-partial-state-update in this case) or type in any other name for your solution.
- Yeoman generator will perform scaffolding process to generate the solution. The scaffolding process will take significant amount of time.
-
Once the scaffolding process is completed, lock down the version of project dependencies by running below command.
npm shrinkwrap -
On the command prompt type below command to open the solution in code editor of your choice.
code .
Define State
-
Create a new file IReactPartialStateUpdateState.ts under “\src\webparts\reactPartialStateUpdate\components" folder.
export interface IReactPartialStateUpdateState { currentDate: Date; randomNumber: number; ramdomText: string; } -
Update our component “\src\webparts\reactPartialStateUpdate\components\ReactPartialStateUpdate.tsx” to use the state.
 import { IReactPartialStateUpdateState } from './IReactPartialStateUpdateState';

 export default class ReactPartialStateUpdate extends React.Component<IReactPartialStateUpdateProps, IReactPartialStateUpdateState> {
   public constructor(props: IReactPartialStateUpdateProps, state: IReactPartialStateUpdateState) {
     super(props);

     this.state = {
       currentDate: new Date(),
       randomNumber: 0,
       ramdomText: ""
     };
   }
 }
Code the WebPart
- Open webpart ReactPartialStateUpdate.tsx under “\src\webparts\reactPartialStateUpdate\components" folder.
-
Add buttons to render method.
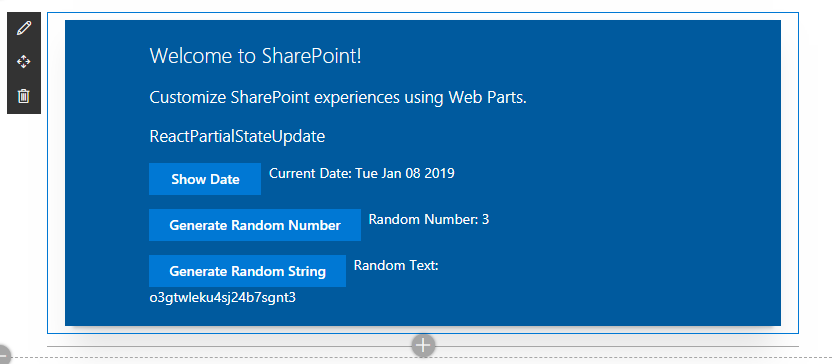
public render(): React.ReactElement<IReactPartialStateUpdateProps> { return ( <div className={styles.reactPartialStateUpdate}> <div className={styles.container}> <div className={styles.row}> <div className={styles.column}> <span className={styles.title}>Welcome to SharePoint!</span> <p className={styles.subTitle}>Customize SharePoint experiences using Web Parts.</p> <p className={styles.description}>{escape(this.props.description)}</p> <div> <a href="#" className={`${styles.button}`} onClick={() => this.clickShowDate()}> <span className={styles.label}>Show Date</span> </a> Current Date: {this.state.currentDate.toDateString()} </div> <p></p> <div> <a href="#" className={`${styles.button}`} onClick={() => this.clickShowRandomNumber()}> <span className={styles.label}>Generate Random Number</span> </a> Random Number: {this.state.randomNumber} </div> <p></p> <div> <a href="#" className={`${styles.button}`} onClick={() => this.clickShowRandomString()}> <span className={styles.label}>Generate Random String</span> </a> Random Text: {this.state.ramdomText} </div> </div> </div> </div> </div> ); } -
Implement the button click methods to set the state partially.
 private clickShowDate(): void {
   this.setState(() => {
     return {
       ...this.state,
       currentDate: new Date()
     };
   });
 }

 private clickShowRandomNumber(): void {
   this.setState(() => {
     return {
       ...this.state,
       randomNumber: Math.floor(Math.random() * 10) + 1
     };
   });
 }

 private clickShowRandomString(): void {
   this.setState(() => {
     return {
       ...this.state,
       ramdomText: Math.random().toString(36).substring(2, 15) + Math.random().toString(36).substring(2, 15)
     };
   });
 }
Spread operator
Using spread operator (…) state of the object that you pass in are copied onto the component’s state. The spread operator can be used to take an existing array and add another element to it while preserving the original array.
Test the WebPart
- On the command prompt, type
gulp serve. - Open SharePoint site.
- Navigate to /_layouts/15/workbench.aspx
- Locate and add the webpart to page.
-
Verify the state by clicking each of the buttons
Troubleshooting
The spread operator will help to update the state partially

Open below url in the next tab of browser. Accept the warning message.
https://localhost:4321/temp/manifests.js
Summary
Spread attribute allows to copy enumerable properties from one object to another. We can use the same in SharePoint Framework to partially update the state.
This content was originally posted here.


Leave a comment