
SharePoint Framework – Call Azure Function
Overview
SharePoint Framework client web parts are used to develop visual components in modern and classic SharePoint. In some scenarios, all the processing cannot happen on SharePoint front and we also need to perform certain processing outside of SharePoint. Azure Functions is one of the most widely used options in these scenarios.
In this article, we will explore how to create a simple Azure Function and consume it in the SharePoint Framework client web part.
Azure Function
Azure functions are serverless computing. It is an event driven, compute on demand experience. Follow below steps to create an Azure function
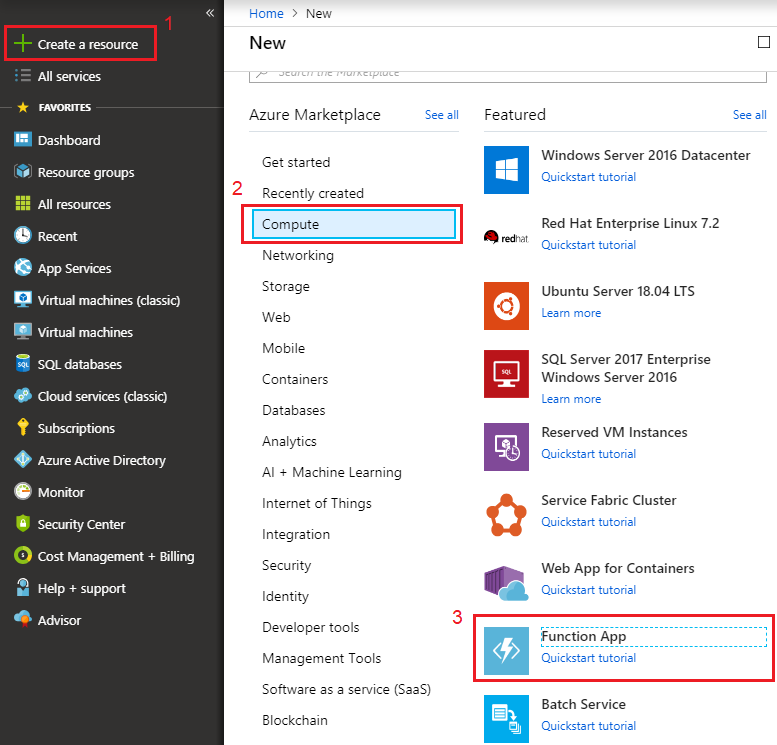
- Open Azure Portal https://portal.azure.com.
- Click Create Resource.
-
Under Compute, select Function App.
-
Fill in the information to create the Function App.
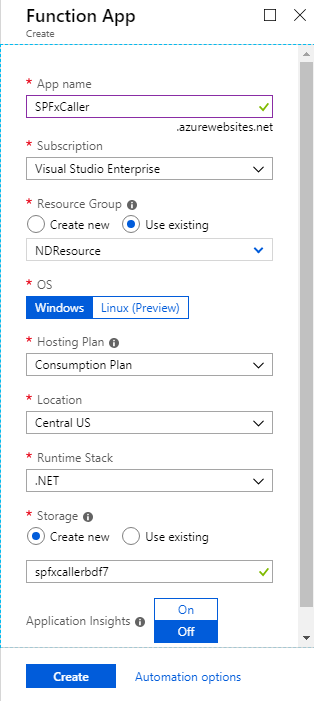
- Click Create.
-
Once the Azure function is ready, click Functions > New function.
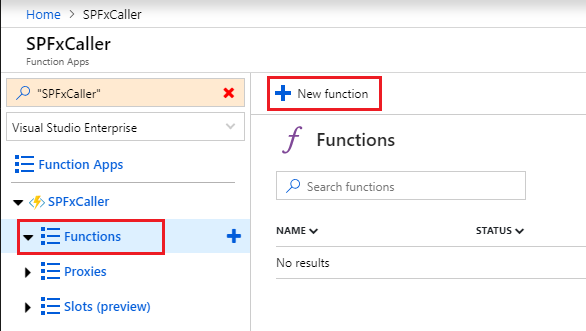
-
Select HTTP trigger.
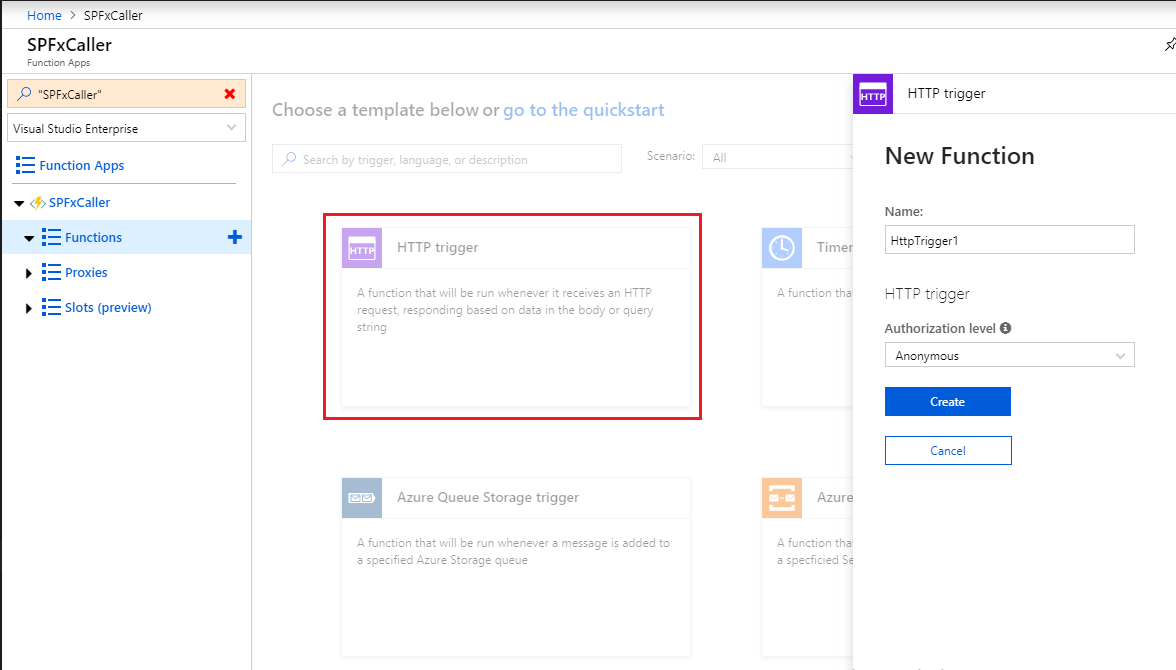
- Type in function name, select Authorization level.
- Click Create.
-
Click Run to test the Azure function.
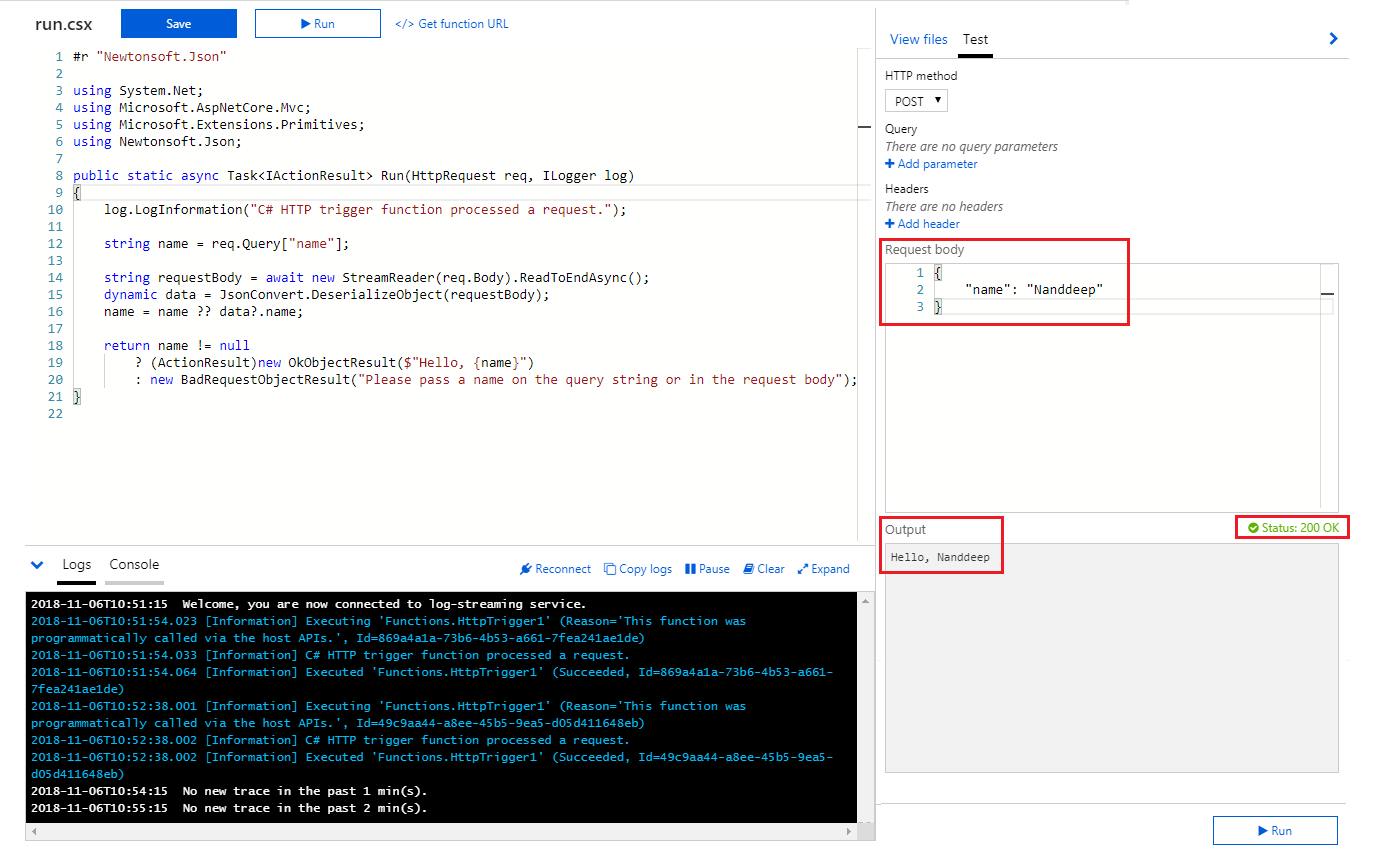
- Verify that for provided input, Azure function is returning expected output. Also, the status code is 200 OK.
-
Click Get function URL.
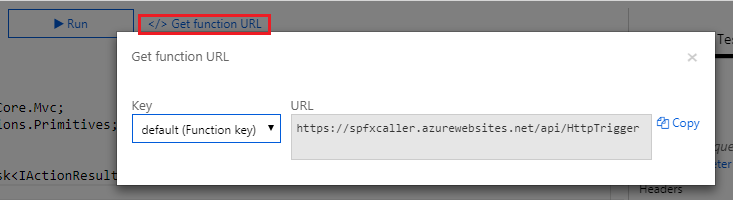
- Copy the function URL.
Enable CORS on Azure Function
The Azure functions are hosted in MS Azure and they run in different domain than our SharePoint site where our SharePoint Framework (SPFx) web part is hosted. By default cross domain calls are not allowed from SharePoint. To overcome this we will have to enable CORS (Cross-Origin Resource Sharing) in Azure function.
Follow below steps to enable CORS on Azure function:
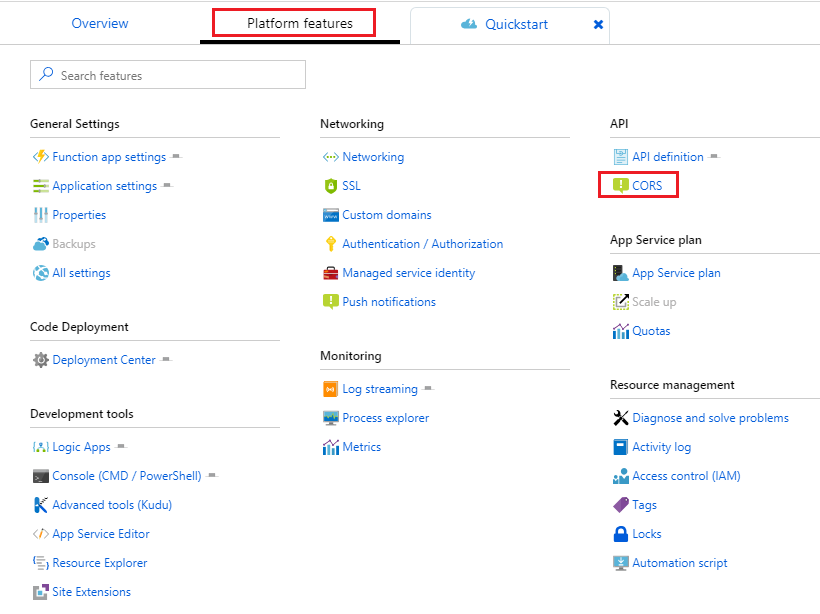
- Click Platform features.
-
Under API, click CORS.
-
Specify the Office 365 tenant domain url and SharePoint local workbench url.
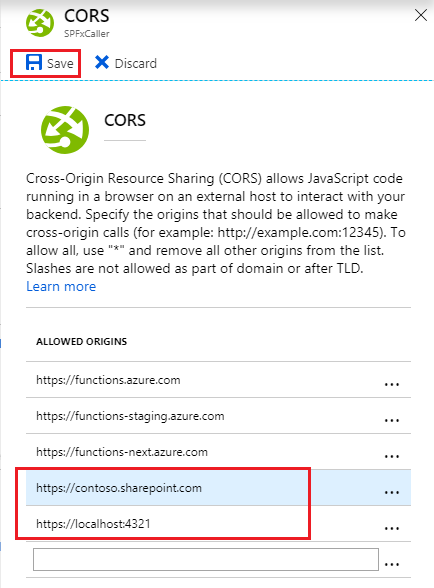
- Click Save.
Develop SharePoint Framework Web Part
-
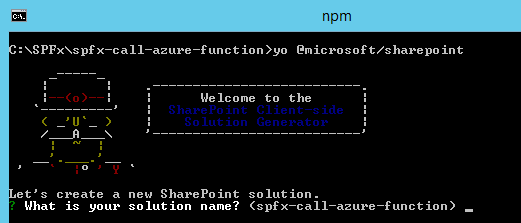
Open command prompt. Create a directory for SPFx solution.
md spfx-call-azure-function -
Navigate to above created directory.
cd spfx-call-azure-function -
Run Yeoman SharePoint Generator to create the solution.
yo @microsoft/sharepoint -
Yeoman generator will present you with the wizard by asking questions about the solution to be created.
- Solution Name: Hit enter to have default name (spfx-call-azure-function in this case) or type in any other name for your solution.
- Selected choice: Hit enter
- Target for component: Here we can select the target environment where we are planning to deploy the client webpart i.e. SharePoint Online or SharePoint OnPremise (SharePoint 2016 onwards).
- Selected choice: SharePoint Online only (latest)
- Place of files: We may choose to use the same folder or create a subfolder for our solution.
- Selected choice: Same folder
- Deployment option: Selecting Y will allow the app to deployed instantly to all sites and will be accessible everywhere.
- Selected choice: N (install on each site explicitly)
- Type of client-side component to create: We can choose to create client side webpart or an extension. Choose webpart option.
- Selected choice: WebPart
- Web part name: Hit enter to select the default name or type in any other name.
- Selected choice: AzureFunctionWebPart
- Web part description: Hit enter to select the default description or type in any other value.
- Selected choice: Call Azure Function from SPFx
- Framework to use: Select any JavaScript framework to develop the component. Available choices are (No JavaScript Framework, React, and Knockout)
- Selected choice: No JavaScript Framework
- Solution Name: Hit enter to have default name (spfx-call-azure-function in this case) or type in any other name for your solution.
- Yeoman generator will perform scaffolding process to generate the solution. The scaffolding process will take significant amount of time.
-
Once the scaffolding process is completed, lock down the version of project dependencies by running below command.
npm shrinkwrap -
On the command prompt type below command to open the solution in code editor of your choice.
code .
Code the web part
- Open AzureFunctionWebPartWebPart.ts under “\src\webparts\azureFunctionWebPart" folder.
-
Add below imports.
import { HttpClient, SPHttpClient, HttpClientConfiguration, HttpClientResponse, ODataVersion, IHttpClientConfiguration, IHttpClientOptions, ISPHttpClientOptions } from '@microsoft/sp-http'; -
Implement method callAzureFunction as below:
export default class AzureFunctionWebPartWebPart extends BaseClientSideWebPart<IAzureFunctionWebPartWebPartProps> { protected functionUrl: string = "https://spfxcaller.azurewebsites.net/api/HttpTrigger"; protected callAzureFunction(): void { const requestHeaders: Headers = new Headers(); requestHeaders.append("Content-type", "text/plain"); requestHeaders.append("Cache-Control", "no-cache"); var siteUrl: string = this.context.pageContext.web.absoluteUrl; var userName: string = (<HTMLInputElement>document.getElementById("txtUserName")).value; console.log(`SiteUrl: '${siteUrl}', UserName: '${userName}'`); const postOptions: IHttpClientOptions = { headers: requestHeaders, body: `{ name: '${userName}' }` }; let responseText: string = ""; let resultMsg: HTMLElement = document.getElementById("responseContainer"); this.context.httpClient.post(this.functionUrl, HttpClient.configurations.v1, postOptions).then((response: HttpClientResponse) => { response.json().then((responseJSON: IData) => { //responseText = JSON.stringify(responseJSON); if (response.ok) { resultMsg.style.color = "white"; } else { resultMsg.style.color = "red"; } resultMsg.innerText = responseJSON.name; }) .catch ((response: any) => { let errMsg: string = `WARNING - error when calling URL ${this.functionUrl}. Error = ${response.message}`; resultMsg.style.color = "red"; console.log(errMsg); resultMsg.innerText = errMsg; }); }); } -
Update render() method as below:
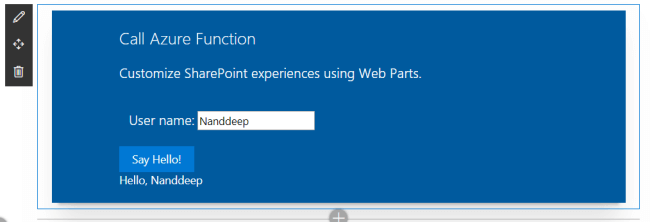
 public render(): void {
   this.domElement.innerHTML = `
     <div class="${ styles.azureFunctionWebPart }">
       <div class="${ styles.container }">
         <div class="${ styles.row }">
           <div class="${ styles.column }">
             <span class="${ styles.title }">Call Azure Function</span>
             <p class="${ styles.subTitle }">Customize SharePoint experiences using Web Parts.</p>

             <div class="${styles.row}">
               <span class="ms-font-l ms-fontColor-white ${styles.label}">User name:</span>
               <input type="text" id="txtUserName"></input>
             </div>

             <button id="btnCallAzureFunction" class="${styles.button}">Say Hello!</button>
             <div id="responseContainer" class="${styles.label}"></div>

           </div>
         </div>
       </div>
     </div>`;

     document.getElementById("btnCallAzureFunction").onclick = this.callAzureFunction.bind(this);
 }
Test the WebPart
- On the command prompt, type
gulp serve. - Open SharePoint site.
- Navigate to /_layouts/15/workbench.aspx
-
Add the webpart to page.
Summary
Complex or long-running processing can be implemented outside of SharePoint in Azure functions and then can be easily consumed in SharePoint Framework client web parts.
This content was originally posted here.


Leave a comment